Learn to Crochet: How to Make a Slipknot and Chain (VIDEO)

If you are following along with my Learn to Crochet series, you will remember that, in my last post, I told you everything you needed to gather before you could get started with your project. This week, I am going to show you how to start your project. Most crochet projects (except some that are worked in the round) start with a slipknot and a certain amount of chains. The first row of stitches is worked into those chains and whatever you are crocheting grows from there. So you can see why it’s important that you know how to chain before you learn anything else.

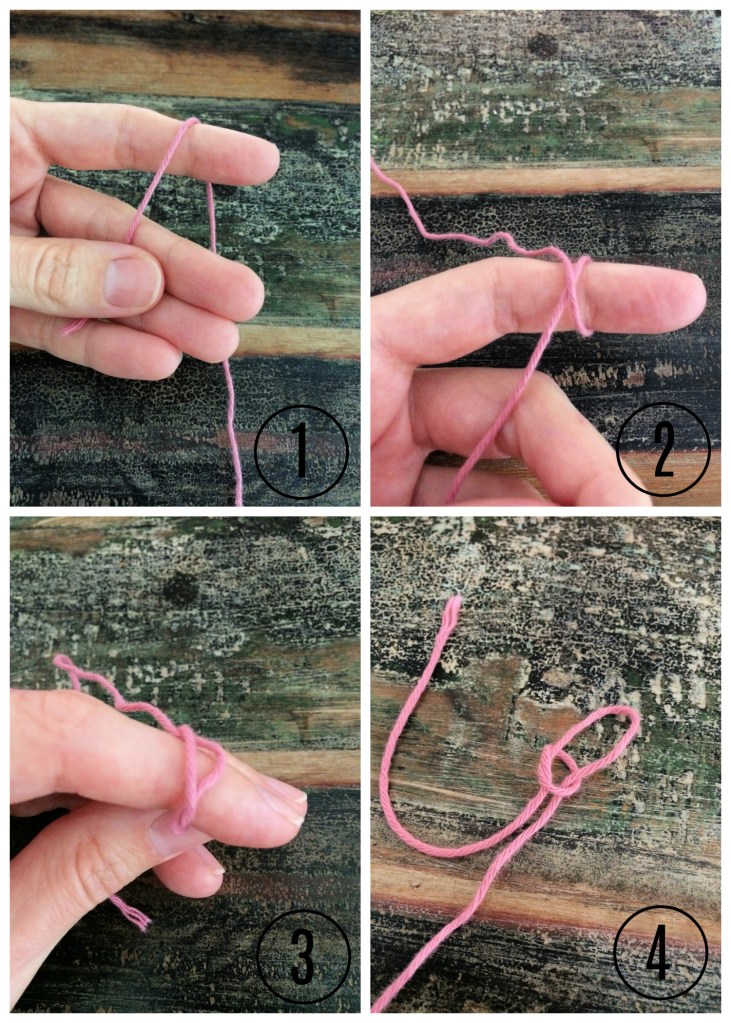
I am using a 4mm crochet hook and 100% cotton yarn. We are just going to start by making a slipknot and 10 chains. To make a slipknot, you need to hold the tail end of the yarn in your left hand and the working end of the yarn in your right hand. Wrap the working end of the yarn around your index finger, from front to back and then to the top of your index finger again, to make an x shape. Pull the working end of the yarn underneath and through the loop on your finger, then pull both the tail end and working end of the yarn, whilst still keeping hold of the loop, to tighten the slipknot.

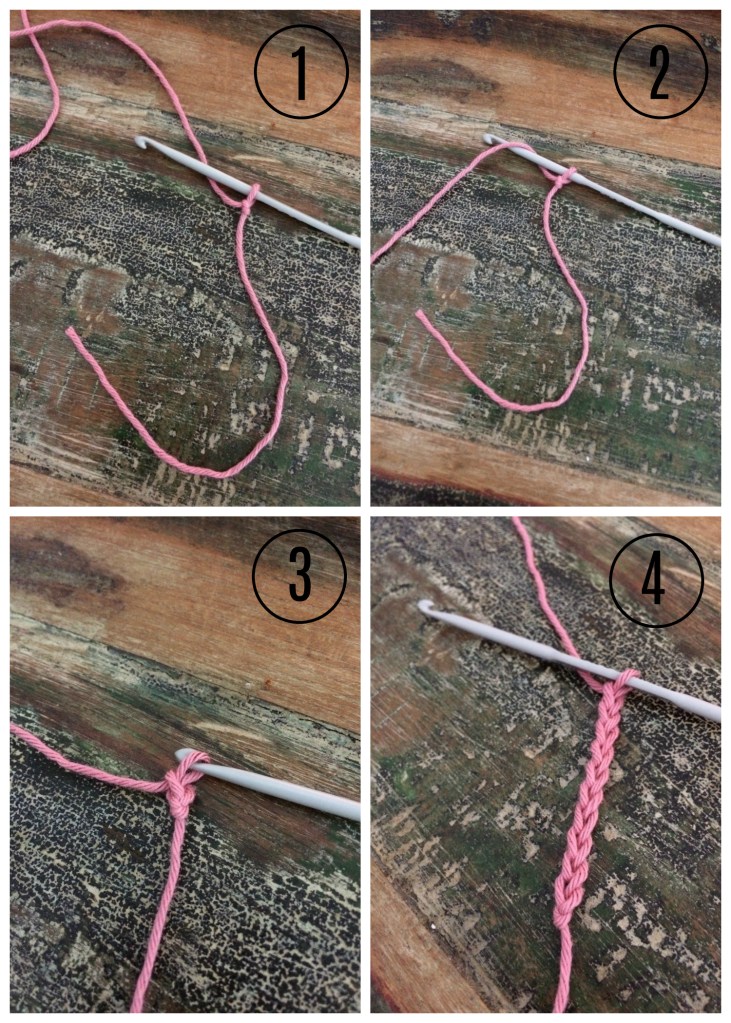
To make your first chain, place the slipknot on to your hook, with the tail end at the back and the working end towards the front. Hold the yarn over your index finger. Pass the hook in front of the yarn, catch the yarn with the hook and pull it through the loop on the hook. Repeat until you have 10 chains on your hook.

Well done! You can now make a slipknot and work the chain stitch. You will be a crochet queen in no time!

Processing…
Success! You're on the list.

Learn to Crochet: Getting Started

So you want to learn to crochet? Brilliant! I hope you come to love it as much as I do. It is definitely a useful skill to have and, aswell as being an amazing hobby, you will have a way to make money for yourself if you ever need to.

Learning a new skill can be hard though, especially if you are learning it online. When I taught myself to crochet, eleven years ago, it was through craft blogs and YouTube videos, so I know it can make things that bit trickier.

With that in mind, I hope that this series will offer some useful advice and help you as you learn how to crochet. I am planning on writing a new lesson every two weeks, to make sure I still have plenty of time to share free patterns and all of the other loveliness I have planned for the blog.

In this first post of the series, I want to show you just how easy it is to get started with learning to crochet. Luckily, you do not need lots of fancy, expensive tools to get started, although you may wish to buy them as you learn more. The fact is that most of them are just not necessary, and you can make plenty of things with just the basics.

In my opinion, the only tools you can not do without are a crochet hook (start with 4mm if you are not sure which size to get), a small pair of scissors, a tape measure and a blunt yarn needle. You will also need a yarn of your choice. I would recommend sticking with a basic double knit yarn when starting out. You will usually find that double knit yarn is available in lots of different colours, is washable and is nice and soft.

When you have your tools ready, I will show you how to start your work, how to do some basic crochet stitches and how to finish your work when you are done.

See you next time!

Processing…
Success! You're on the list.