In my last two Learn to Crochet videos, I taught you which tools you really need to get started in crochet, and how to work a slipknot and chain. In this video, I am going to show you how to work the single crochet stitch. The single crochet stitch is one of the most basic crochet stitches, and one that I use most days, so it is definitely a useful stitch to know.
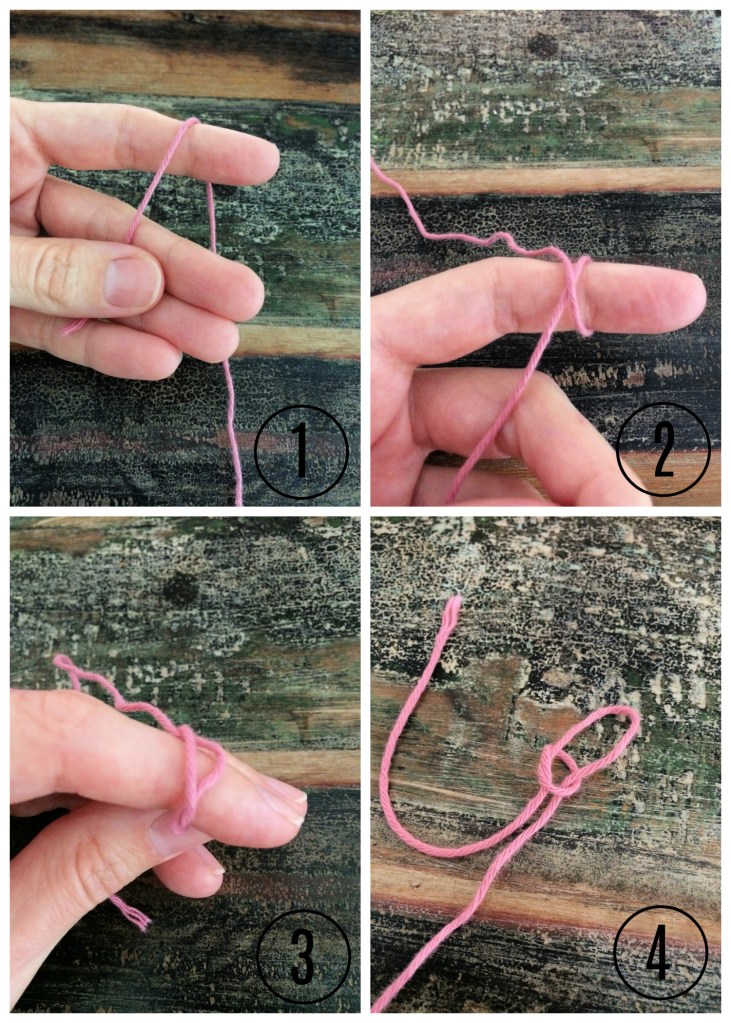
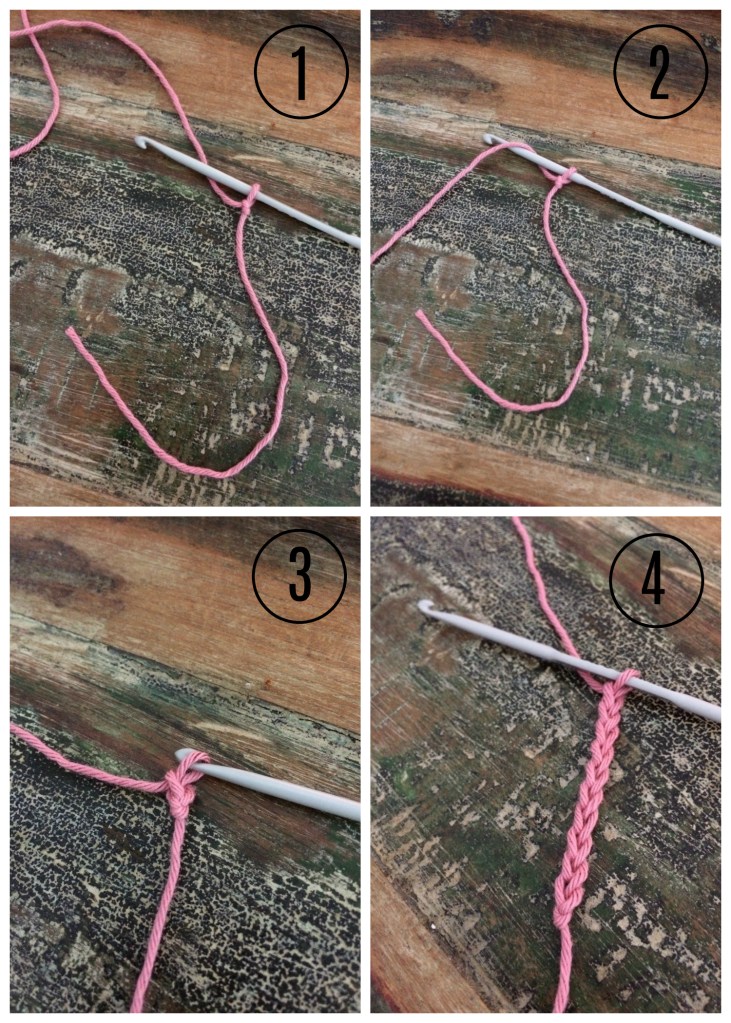
For this square, I used a 4mm crochet hook and double knit yarn. You can use whichever hook size and yarn you prefer, but please remember that a different sized hook or yarn will give different finished measurements. To start, you will need to make a slipknot and chain 22. To make the single crochet, insert your hook into the second chain from the hook. Catch the yarn and bring it through the chain, which should give you two loops on your hook. Catch the yarn again and bring it through both loops. You have just worked a single crochet.
You can now make a slipknot, chain and work a single crochet. Well done! You’re well on your way to becoming an expert crocheter.
Processing…
Success! You're on the list.
Whoops! There was an error and we couldn't process your subscription. Please reload the page and try again.
With the weather getting colder, I figured that now is the best time to release my baby hoodie pattern. I have been making these little baby hoodies for as long as I can remember and I finally managed to write my pattern down as a PDF. The pattern is currently available in sizes newborn, 0-6m and 6-12m. More sizes will be released when I have had chance to sit down and write up the PDF for them. I love that this baby hoodie is so cute and cosy. The hoodie can be made without the bear ears, but for me bear ears are always a plus, so they always get added.
The hoodie is made using double knit yarn and two different sized crochet hooks. The pattern is easy to follow and is suitable for beginners, although basic knowledge of crochet is needed. I have written the pattern using US terminology.
You can find the baby hoodie pattern in my Etsy shop, alongside my other PDF patterns and a few things I have crocheted and are ready made for sale. The toddler sized version of this pattern is available here, and for a combined pattern to fit from newborn to 4 years, click here. Feel free to join us in my Facebook group to see more pictures, get feedback and ask any questions you may have.
Processing…
Success! You're on the list.
Whoops! There was an error and we couldn't process your subscription. Please reload the page and try again.
This month I have been doing a lot of admin, so I haven’t had as much time to crochet as I would’ve liked. I still managed to make lots of cute things though, most of which are up for sale in my Etsy shop.
The first thing I made in August were these very cute baby sandals. I made them for a PDF pattern that I was designing. Both the PDF pattern and the finished sandals are available in my Etsy shop.
I also made some baby booties in three different colours, blue, lilac and beige. I love that these baby booties are so cute and gender neutral. The pattern can be found on my blog and the finished booties can be found on my Etsy shop.
I made lots of earsavers, for use with face masks. I love them because face masks leave me with really sore ears. I gave some to family and friends, and listed some in my Etsy shop. The pattern I used is my own, and is on my blog.
The last things I made in August were varying sizes of baby hoodies, with very cute baby bear ears, for a PDF pattern. The PDF pattern and the finished hoodies can be found in my Etsy shop.
Why not head over to my Facebook group and show us what you have been working on this month. We would love to see it.
Processing…
Success! You're on the list.
Whoops! There was an error and we couldn't process your subscription. Please reload the page and try again.
These crochet baby booties are cute and unisex, making a lovely gift for a new baby. The free pattern is perfect for beginners, or for more experienced crocheters wanting a quick and easy project. The pattern is available in sizes newborn and 0-3 months.
To make your own baby booties, you will need a 4.5mm crochet hook (or whichever size hook you need to achieve the right measurements), double knit yarn, a tape measure, a pair of scissors and a yarn needle.
The pattern is available in sizes newborn and 0-3 months. The finished newborn sole should measure 4.25″ and the finished 0-3 months sole should measure 4.5″. My tension tends to be quite tight so please use whichever crochet hook size you need to get these measurements.
Basic Baby Booties (Free Crochet Pattern)
Newborn
To fit up to approximately 3.5” foot
4.25” sole length
Sole:
With a 4.5mm crochet hook and two strands double knit yarn held together –
1. ch12, 5dcs in 3rd ch from hook, dc in next 8sts, 5dcs in last st, (turn to work along opposite side of chain), dc in next 8sts, join with slst in top of 1st dc (26)
2. ch1, turn, 2hdcs in same st as ch, hdc in next 8sts, work 2hdcs in each of next 5sts, hdc in next 8sts, work 2hdcs in each of next 4sts, join with slst in top of 1st hdc, bind off (36)
Upper:
With a 4.5mm crochet hook and one strand double knit yarn –
1. with wrong side facing and working in back loops only, join yarn at bottom of sole, ch1, hdc in same st as ch and around, join with slst in top of 1st hdc (36)
2. ch1, turn, sc in same st as ch and next 8sts, hdc in next st, hdc2tog x 8, hdc in next st, sc in 9sts, join with slst in top of 1st sc (28)
3. ch1, turn, sc in same st as ch and next 8sts, hdc in next st, hdc2tog x 4, hdc in next st, sc in 9sts, join with slst in top of 1st sc (24)
4. ch1, turn, sc in same st and each st around, join with slst in top of 1st sc (24)
5. ch2, dc in same st and each st around, join with slst in top of 1st dc (24)
6. ch1, hdc in same st and each st around, join with slst in top of 1st hdc (24)
7. ch1, sc in same st and each st around, join with slst in top of 1st sc, bind off and weave in ends (24)
0-3m
To fit up to approximately 3.75” foot
4.5” sole length
Sole:
With a 4.5mm crochet hook and two strands double knit yarn held together –
1. ch13, 5dcs in 3rd ch from hook, dc in next 9sts, 5dcs in last st, (turn to work along opposite side of chain), dc in next 9sts, join with slst in top of 1st dc (28)
2. ch1, turn, 2hdcs in same st as ch, hdc in next 9sts, work 2hdcs in each of next 5sts, hdc in next 9sts, work 2hdcs in each of next 4sts, join with slst in top of 1st hdc, bind off (38)
Upper:
With a 4.5mm crochet hook and one strand double knit yarn –
1. with wrong side facing and working in back loops only, join yarn at bottom of sole, ch1, hdc in same st as ch and around, join with slst in top of 1st hdc (38)
2. ch1, turn, sc in same st as ch and next 9sts, hdc in next st, hdc2tog x 8, hdc in next st, sc in 10sts, join with slst in top of 1st sc (30)
3. ch1, turn, sc in same st as ch and next 9sts, hdc in next st, hdc2tog x 4, hdc in next st, sc in 10sts, join with slst in top of 1st sc (26)
4. ch1, turn, sc in same st and each st around, join with slst in top of 1st sc (26)
5. ch2, dc in same st and each st around, join with slst in top of 1st dc (26)
6. ch1, hdc in same st and each st around, join with slst in top of 1st hdc (26)
7. ch1, sc in same st and each st around, join with slst in top of 1st sc, bind off and weave in ends (26)
I hope you have enjoyed this pattern. Please let me know if you make anything using any of my patterns. I would love to see your work. You can tag me on social media (@adeleuyancrochet) or why not join our Facebook group to show off your creations.
Processing…
Success! You're on the list.
Whoops! There was an error and we couldn't process your subscription. Please reload the page and try again.
If you are following along with my Learn to Crochet series, you will remember that, in my last post, I told you everything you needed to gather before you could get started with your project. This week, I am going to show you how to start your project. Most crochet projects (except some that are worked in the round) start with a slipknot and a certain amount of chains. The first row of stitches is worked into those chains and whatever you are crocheting grows from there. So you can see why it’s important that you know how to chain before you learn anything else.
I am using a 4mm crochet hook and 100% cotton yarn. We are just going to start by making a slipknot and 10 chains. To make a slipknot, you need to hold the tail end of the yarn in your left hand and the working end of the yarn in your right hand. Wrap the working end of the yarn around your index finger, from front to back and then to the top of your index finger again, to make an x shape. Pull the working end of the yarn underneath and through the loop on your finger, then pull both the tail end and working end of the yarn, whilst still keeping hold of the loop, to tighten the slipknot.
To make your first chain, place the slipknot on to your hook, with the tail end at the back and the working end towards the front. Hold the yarn over your index finger. Pass the hook in front of the yarn, catch the yarn with the hook and pull it through the loop on the hook. Repeat until you have 10 chains on your hook.
Well done! You can now make a slipknot and work the chain stitch. You will be a crochet queen in no time!
Processing…
Success! You're on the list.
Whoops! There was an error and we couldn't process your subscription. Please reload the page and try again.
This week, I wanted a quick and easy project to make when the children were in bed. I always struggle to know what to crochet in the height of summer, because obviously hats and jumpers are out of the picture, and they are my two most crocheted things! I decided to focus on something for the home and, after a lot of scrolling through Pinterest, I decided I wanted to make a potholder for the middle of our dining table. I looked through lots of designs and originally started on a basic square one. I really did not like the way it was turning out, and decided I wanted something a bit more summery and a bit prettier. I pulled out all of my stitches and started working on a round design. I wanted something a bit more than just a plain circle so I started messing around with adding chain spaces to make the holes in the design. It took me a good few attempts and lots of pulling stitches to get a design that I was happy with, but I really love the way it turned out. It definitely did not end up being a quick and easy project for me, design wise at least, but I made a second one when the pattern was finished, and it made up really easily and very quickly. I love the pop of colour it adds to our neutral tablecloth and this will be used every day! I am also planning on making some to gift to people, in a variety of colours.
To make your own, you will need a 5mm crochet hook, 50g double knit yarn, a pair of scissors and a yarn needle.
Potholder Hot Pad (Free Crochet Pattern)
with a 5mm hook and two strands of double knit yarn held together, make a magic loop, ch2, work 12dcs into the loop, join with slst in top of 1st dc (12)
ch1, turn, sc in st at base of ch, ch1, *sc in next st, ch1*, repeat from *-* across to end, join with slst in top of 1st sc
turn but do not chain, slst into 1st chsp, ch2, work 3dcs in each chsp around, join with slst in top of 1st dc (36)
ch1, turn, sc in st at base of ch, ch2, skip next st, *sc in next st, ch2, skip next st*, repeat from *-* across to end, join with slst in top of 1st sc
turn but do not chain, slst into 1st chsp, ch2, work 3dcs in each chsp around, join with slst in top of 1st dc (54)
ch1, turn, sc in st at base of ch, ch3, skip next 2sts, *sc in next st, ch3, skip next 2sts*, repeat from *-* across to end, join with slst in top of 1st sc
turn but do not chain, slst into 1st chsp, ch2, work 4dcs in each chsp around, join with slst in top of 1st dc (72)
ch1, turn, sc in st at base of ch, ch4, skip next 3sts, *sc in next st, ch4, skip next 3sts*, repeat from *-* across to end, join with slst in top of 1st sc
turn but do not chain, slst into 1st chsp, ch2, work 5dcs in each chsp around, join with slst in top of 1st dc (90)
ch1, turn, sc in st at base of ch, ch3, skip next 2sts, *sc in next st, ch3, skip next 2sts*, repeat from *-* across to end, join with slst in top of 1st sc
ch1, turn, *sc, hdc, dc, hdc, sc* in each chsp around, join with slst in top of 1st sc
bind off and weave in ends
I hope you like this free pattern and make your own summery potholder. Let me know if you do make one, I love to see your work. You can tag me on social media (@adeleuyancrochet) so I can see what you have made, or why not join our Facebook group to show off your creations.Happy crocheting!
Processing…
Success! You're on the list.
Whoops! There was an error and we couldn't process your subscription. Please reload the page and try again.
Don’t you just love giving handmade gifts for Christmas and birthdays. I do! I know how much time and effort goes into making them so I always appreciate handmade gifts. I have made this bath set for several of my family and friends for different occasions over the years. It makes a lovely little gift set if paired with a bottle of bubble bath and a bar of soap.
This pattern should be suitable for beginners. If you do not yet know how to crochet, you can find a basic how to crochet video here.
If you would like to make your own, you will need a 6mm crochet hook and DK yarn. You will also need a pair of scissors and a yarn needle.
Free Crochet Bath Set Pattern
Bath Puff
Main:
with two strands DK yarn held together, make a magic ring, ch2, work 10dcs in ring, join with slst in top of 1st dc, do not pull the centre tight (10)
ch2, turn, 3hdcs in each st around, join with slst in top of 1st hdc (30)
ch2, turn, 2dcs in each st around, join with slst in top of 1st dc
repeat rounds 1-3 five more times
weave in outside ends but not magic ring ends
Tie:
with two strands DK yarn held together, ch60, slst in 2nd ch from hook and across
bind off and weave in ends
fold the tie in half and tie a knot at the bottom to form a loop
loosen magic rings on each piece of bath puff and push the knot through, repeat until all six pieces are on the tie
weave in the magic ring ends, pulling tightly closed around the tie
push the bath puff pieces down firmly and tie a knot at the top, making sure bath puff pieces are still tightly squashed together
Soap Bag
Main:
with two strands DK yarn held together, ch14, dc in 3rd ch from hook and across (12)
ch2, turn, dc in st at base of ch and across (12)
repeat row 2 eight times or until work measures 7″
fold in half along long edge then work slst down one side, across the bottom and up the other side to make a bag
bind off and weave in ends
Tie:
with one strand DK, ch50, slst in 2nd ch from hook and across
bind off and weave in ends
weave through the top row on the soap bag and knot each end
add soap and pull tie tight to close
I hope you enjoyed making this crochet bath set. I would love to see any sets you make using this pattern. Feel free to tag me on social media (@adeleuyancrochet) so I can see them! Or why not join our Facebook group to show off your creations. Happy crocheting.
Processing…
Success! You're on the list.
Whoops! There was an error and we couldn't process your subscription. Please reload the page and try again.