This pattern has been a long time in the making and I am so happy that it is finally finished and tested so I can share it with you all. I think it turned out really cute. I love little frilly bonnets and used to always dress my daughters in them when they were small. They really complete an outfit and look so adorable.
With this pattern, you will learn how to make a frilly baby bonnet to fit ages from newborn to 12 months, or head circumferences from approximately 14″ to 18″. The pattern is written in English, uses American terminology and features the single crochet stitch, half double crochet stitch, double crochet stitch and puff stitch. Basic knowledge of crochet is assumed, however the pattern is suitable for beginners and instructions are given for some stitches.
To make this pattern, you will need around 50g double knit yarn, a small amount of double knit yarn in a contrasting colour, a small amount of fluffy yarn, a tape measure, a stitch marker, a pair of scissors, a yarn needle, 50cm thin ribbon and a needle and thread. Each size uses a different crochet hook, varying from 4mm to 5mm. If you would like to know which crochet hook is required for your particular size, feel free to message me and I will check for you before you buy.
You can find this pattern in myEtsy shop, along with my other PDF crochet patterns and a few things I have handmade to sell. I would love for you to join us in my Facebook group to see more pictures, get feedback and ask any questions you may have.
Processing…
Success! You're on the list.
Whoops! There was an error and we couldn't process your subscription. Please reload the page and try again.
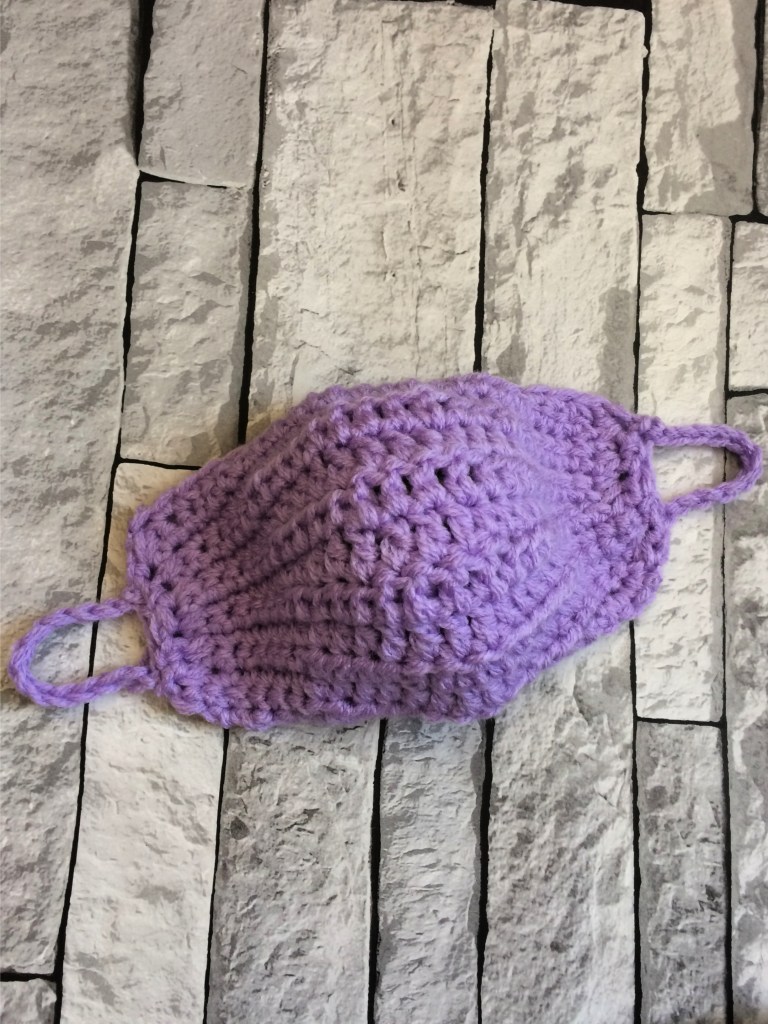
With everything going on at the minute, and the amount of conflicting information available, it is very difficult to know what to do for the best. I have seen lots of articles saying that face masks should not be worn by the general public because they do not work and are only meant to be used for a short time. However, I have also seen plenty of articles saying that every little helps and that we should be wearing masks, just like other countries are doing, and that if they do nothing else, at least they stop you from touching your face whilst outside, and potentially stop you from infecting other people if you are a carrier but are not showing symptoms. That last point was enough for me to make face masks for my family. We are mostly staying at home, and we are extremely lucky to be able to, but the thought of possibly being a carrier and infecting someone who does not have that luxury or may have underlying health issues, does not sit well with me at all. A few days ago, I sat down and wrote out a pattern for face masks. I made three sizes, adult, child and toddler, and will share all three with you today. It is, of course, up to you whether you choose to wear masks in public, but, for me, the pros far outweigh the cons.
To make your own face mask, you will need some double knit yarn (I used two strands held together), a 4mm, 6mm or 6.5mm hook, a pair of scissors and a yarn needle. You will also need some type of cotton material, to be used as a lining. The masks work up very quickly and they are very easy to make.
Adult:
1. with a 6.5mm crochet hook and two strands of double knit yarn held together, ch25, sc in 2nd ch from hook and next 5sts, hdc in 4sts, dc in 4sts, hdc in 4sts, sc in 6sts
2-11. ch1, turn, sc in 6sts, hdc in 4sts, dc in 4sts, hdc in 4sts, sc in 6sts
12. ch1, turn, *sc2tog, sc in 2sts*, repeat from *-* to end, bind off
13. with wsf, join yarn at bottom corner, ch1, *sc2tog, sc in 2sts*, repeat from *-* across bottom edge, bind off
14. with rsf, join yarn at top corner of mask, ch1, sc2tog in every stitch down the side of the mask (7)
15. ch1, turn, sc2tog, sc3tog, sc2tog (3)
16. ch12, turn, join with slst in last st of row, bind off
17-19. repeat rows 14-16 on opposite side of mask
20. weave in all ends, line with cotton and wear!
Child:
1. with a 6mm crochet hook and two strands of double knit yarn held together, ch25, sc in 2nd ch from hook and next 5sts, hdc in 4sts, dc in 4sts, hdc in 4sts, sc in 6sts
2-11. ch1, turn, sc in 6sts, hdc in 4sts, dc in 4sts, hdc in 4sts, sc in 6sts
12. ch1, turn, *sc2tog, sc in 2sts*, repeat from *-* to end, bind off
13. with wsf, join yarn at bottom corner, ch1, *sc2tog, sc in 2sts*, repeat from *-* across bottom edge, bind off
14. with rsf, join yarn at top corner of mask, ch1, sc2tog in every stitch down the side of the mask (7)
15. ch1, turn, sc2tog, sc3tog, sc2tog (3)
16. ch12, turn, join with slst in last st of row, bind off
17-19. repeat rows 14-16 on opposite side of mask
20. weave in all ends, line with cotton and wear!
Toddler:
1. with a 4mm crochet hook and two strands of double knit yarn held together, ch25, sc in 2nd ch from hook and next 5sts, hdc in 4sts, dc in 4sts, hdc in 4sts, sc in 6sts
2-10. ch1, turn, sc in 6sts, hdc in 4sts, dc in 4sts, hdc in 4sts, sc in 6sts
11. ch1, turn, *sc2tog, sc in 2sts*, repeat from *-* to end, bind off
12. with wsf, join yarn at bottom corner, ch1, *sc2tog, sc in 2sts*, repeat from *-* across bottom edge, bind off
13. with rsf, join yarn at top corner of mask, ch1, sc2tog in every stitch down the side of the mask, sc in last st (7)
14. ch1, turn, sc2tog, sc3tog, sc2tog (3)
15. ch12, turn, join with slst in last st of row, bind off
16-18. repeat rows 13-15 on opposite side of mask
19. weave in all ends, line with cotton and wear!
I hope you have enjoyed this free pattern. If you make anything from my patterns, please tag me on social media (@adeleuyancrochet) so I can see. I love to see what you have been making. Or why not join our Facebook group to show off your creations. For now, stay safe and happy crocheting!
Processing…
Success! You're on the list.
Whoops! There was an error and we couldn't process your subscription. Please reload the page and try again.
Ever since my babies were born, I have preferred an earflap hat over a basic beanie. I find that an earflap hat keeps little ears warmer, it can be tied on to stop it from falling off, and it tends to fit for longer than a beanie hat. All of my babies have had earflap hats made by me and it is my usual gift for new babies aswell.
A few years ago, I came up with this pattern for an owl earflap hat. Since then, I have made hundreds of hats with it. This hat is really easy to make but it looks like a lot of work went into it. It can be made in a variety of colours to mix it up but looks amazing in neutral colours well.
This pattern is for an owl earflap hat in size newborn. Newborn size will fit up to approximately 14.5″ head circumference. The finished hat has a diameter of 3.9″ and is 4.75″ in height.
To make your own owl earflap hat, you will need approximately 30g double knit yarn, a 3mm crochet hook, a 4mm crochet hook, scissors, a tape measure, scraps of white, black and yellow yarn and a yarn needle.
Crochet Owl Earflap Hat (Free Pattern)
Hat:
1. with a 4mm crochet hook, make a magic loop, ch2, work 12dcs in loop, join with slst in top of 1st dc, pull centre yarn tail tight to close magic loop (12)
2. (inc row) ch2, turn, work
2dcs in st at base of ch and each st around, join with slst in top of
1st
dc (24)
3. (inc row) ch2, turn, work
2dcs in st at base of ch, dc in next st, *2dcs in next st, dc in next
st*, repeat from *-* around, join with slst in top of 1st
dc (36)
4. (inc row) ch2, turn, work
2dcs in st at base of ch, dc in next 2sts, *2dcs in next st, dc in
next 2sts*, repeat from *-* around, join with slst in top of 1st
dc (48)
5-6. ch2,
turn, work dc in st at base of ch and in each st around, join with
slst in top of 1st
dc (48)
7-11. change
to second yarn colour if using, ch2, turn, work dc in st at base of
ch and in each st around, join with slst in top of 1st
dc (48)
12. bind
off and weave in ends
Earflap 1:
1. with
wrong side facing, join yarn in 6th
st from bind off, ch1, sc in same st and next 12sts (13)
2. ch1, turn, sc2tog, sc across
to last 2sts, sc2tog (11)
3. ch1, turn, sc in same st and
across (11)
4. ch1, turn, sc2tog, sc across
to last 2sts, sc2tog (9)
5. ch1, turn, sc in same st and
across (9)
6. ch1, turn, sc2tog, sc across
to last 2sts, sc2tog (7)
7. ch1, turn, sc in same st and
across (7)
8. ch1, turn, sc2tog, sc across
to last 2sts, sc2tog (5)
9. ch1, turn, sc in same st and
across (5)
10. ch1, turn, sc2tog, sc across
to last 2sts, sc2tog (3)
11. ch1, turn, sc in same st and
across (3)
12. bind off and weave in ends
Earflap 2:
1. with
wrong side facing, join yarn in 30th
st from bind off, ch1, sc in same st and next 12sts (13)
2. ch1, turn, sc2tog, sc across
to last 2sts, sc2tog (11)
3. ch1, turn, sc in same st and
across (11)
4. ch1, turn, sc2tog, sc across
to last 2sts, sc2tog (9)
5. ch1, turn, sc in same st and
across (9)
6. ch1, turn, sc2tog, sc across
to last 2sts, sc2tog (7)
7. ch1, turn, sc in same st and
across (7)
8. ch1, turn, sc2tog, sc across
to last 2sts, sc2tog (5)
9. ch1, turn, sc in same st and
across (5)
10. ch1, turn, sc2tog, sc across
to last 2sts, sc2tog (3)
11. ch1, turn, sc in same st and
across (3)
12. bind off and weave in ends
Eyes: make two
1. with black yarn and a 3mm
hook, make a magic loop, ch2, work 12hdcs in loop, join with slst in
top of 1st
hdc, pull centre yarn tail tight to close magic loop (12)
2. (inc row) with colour yarn,
ch2, turn, work 2hdcs in st at base of ch and each st around, join
with slst in top of 1st
hdc (24)
3. (inc row) with white yarn,
ch2, turn, work 2dcs in st at base of ch, dc in next st, *2dcs in
next st, dc in next st*, repeat from *-* around, join with slst in
top of 1st
dc (36)
4. bind off, leaving a long tail
to attach to hat
Beak:
1. with yellow yarn and a 3mm
hook, ch7, sc in 2nd ch from hook and across (6)
2. ch1, turn, sc2tog, sc across
to last 2sts, sc2tog (4)
3. ch1, turn, sc across (4)
4. ch1, turn, sc2tog, sc2tog (2)
5. ch1, turn, sc across (2)
6. ch1, turn, sc2tog, bind off, leaving a long tail to attach to hat
Finishing:
1. with right side facing, join yarn at back, ch1, sc in each st around bottom of hat to bottom corner of 1st earflap, work 2scs in corner st, sc in middle st, ch35, slst in 2nd ch from hook and across, sc again in middle st to secure, work 2scs in corner st, sc around to bottom corner of 2nd earflap, work 2scs in corner st, sc in middle st, ch35, slst in 2nd ch from hook and across, sc again in middle st to secure, work 2scs in corner st, sc around to end, join with slst in 1st st, bind off and weave in ends
2. attach eyes to front of hat
3. attach beak under the eyes
4. to make the ear tassels, cut 6 lengths of yarn 5″ in length then use a crochet hook to pull them through the hat between the 3rd and 4th row, secure with a loop
I hope you enjoyed making this pretty hat. Let me know if you make it. I would love to see your creations on social media. Tag me (@adeleuyancrochet) so I can find it. Or why not join our Facebook group to show off your creations.
What other patterns would you like to see?
Processing…
Success! You're on the list.
Whoops! There was an error and we couldn't process your subscription. Please reload the page and try again.
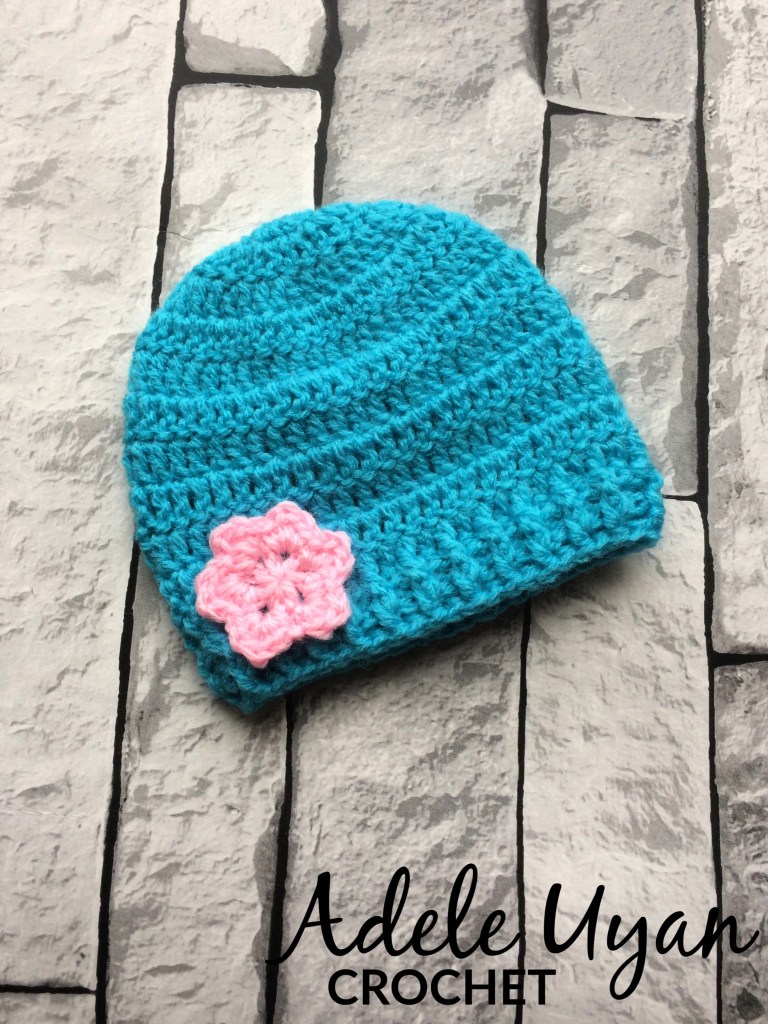
I made my first preemie flower beanie around 8 years ago, for a friend of mine who had just given birth to her baby at 24 weeks gestation. This hat fit the baby really nicely and she was approximately 5lbs at the time.
This hat will fit up to approximately 12″ head circumference. I tend to crochet quite tightly so you may need to adjust your hook size to get the diameter you need. At the end of round 4, the hat should measure 3.4″ in diameter, and the finished hat should measure 4.5″ in length.
To make your own preemie flower beanie hat, you will need some super soft DK yarn, a 3mm crochet hook, a tape measure, a pair of scissors and a yarn needle.
Preemie Flower Beanie (Free Crochet Pattern)
With a 3mm crochet hook –
1. make a magic loop, ch2, work 12dcs in loop, join with slst in top of 1st dc, pull centre yarn tail tight to close magic loop (12)
2. (inc row) ch2, turn, work 2dcs in st at base of ch and each st around, join with slst in top of 1st dc (24)
3. (inc row) ch2, turn, work 2dcs in st at base of ch, dc in next st, *2dcs in next st, dc in next st*, repeat from *-* around, join with slst in top of 1st dc (36)
4. (inc row) ch2, turn, work 2dcs in st at base of ch, dc in next 2sts, *2dcs in next st, dc in next 2sts*, repeat from *-* around, join with slst in top of 1st dc (48)
5-10. ch2, turn, work dc in st at base of ch and in each st around, join with slst in top of 1st dc (48)
11. join contrasting yarn if using, ch2, turn, work dc in st at base of ch and in each st around, join with slst in top of 1st dc (48)
12-13. ch1, turn, fpdc around 1st st of previous row, *bpdc around next st of previous row, fpdc around next st of previous row*, repeat from *-* around to end, join with slst in top of 1st fpdc
14. bind off and weave in ends
Flower:
with contrasting yarn, make a magic loop, ch1, *sc in ring, ch3*, repeat from *-* five more times to make six petals, join with slst in top of 1st sc, pull centre yarn tail tight to close magic loop
ch1, do not turn, (sc, hdc, dc, hdc, sc) in each chsp around, join with slst in top of 1st sc
bind off, attach to hat and weave in ends
I hope you have enjoyed this free pattern. I would love to see any hats you make using it. Feel free to tag me on social media (@adeleuyancrochet) so I can see them. Or why not join our Facebook group to show off your creations. Happy crocheting!
Processing…
Success! You're on the list.
Whoops! There was an error and we couldn't process your subscription. Please reload the page and try again.
I love making these pretty dishcloths to use when I wash the dishes. They are quite abrasive, due to the pattern, and are very good at removing dirt and grease. They wash well in the washing machine and dry quickly. I love the way that they add a pop of colour to an otherwise dull job. Size small is perfect for me for washing dishes and I like to use size medium for other cleaning jobs.
To make your own, you will need a 5mm hook, a small amount of double knit yarn, a pair of scissors and a yarn needle. This pattern uses American terminology and should be suitable for beginners.
Crochet Dishcloth (Free Pattern)
Small:
1. loosely ch19, 2dcs in 5th st from ch, ch1, 2dcs in same st (shell made), sk1st, *dc in next st, sk1st, 2dcs in next st, ch1, 2dcs in same st, sk1st*, repeat from *-* across to last st, work dc in last st
2. ch3, turn, work shell in previous row’s shell chsp, dc in top of previous row’s dc, end with dc in top of ch3
3-6. repeat row 2 again
7. do not ch or turn, work 4 more dcs in corner st, work alternating dcs and shells across in each hole on way up the side of the cloth until you reach the next corner, work 5dcs in the corner space, continue until you have worked 3 edges, do 4dcs in last corner, join with a sl st in top of ch 3
8. bind off and weave in ends
Medium:
1. loosely ch23, 2dcs in 5th st from ch, ch1, 2dcs in same st (shell made), sk1st, *dc in next st, sk1st, 2dcs in next st, ch1, 2dcs in same st, sk1st*, repeat from *-* across to last st, work dc in last st
2. ch3, turn, work shell in previous row’s shell chsp, dc in top of previous row’s dc, end with dc in top of ch3
3-8. repeat row 2 again
9. do not ch or turn, work 4 more dcs in corner st, work alternating dcs and shells across in each hole on way up the side of the cloth until you reach the next corner, work 5dcs in the corner space, continue until you have worked 3 edges, do 4dcs in last corner, join with a sl st in top of ch 3
10. bind off and weave in ends
I hope you enjoyed this pattern. I would love to see any dishcloths you make! Feel free to tag me on social media (@adeleuyancrochet) so I can see them. Or why not join our Facebook group to show off your creations. Happy crocheting.
Processing…
Success! You're on the list.
Whoops! There was an error and we couldn't process your subscription. Please reload the page and try again.
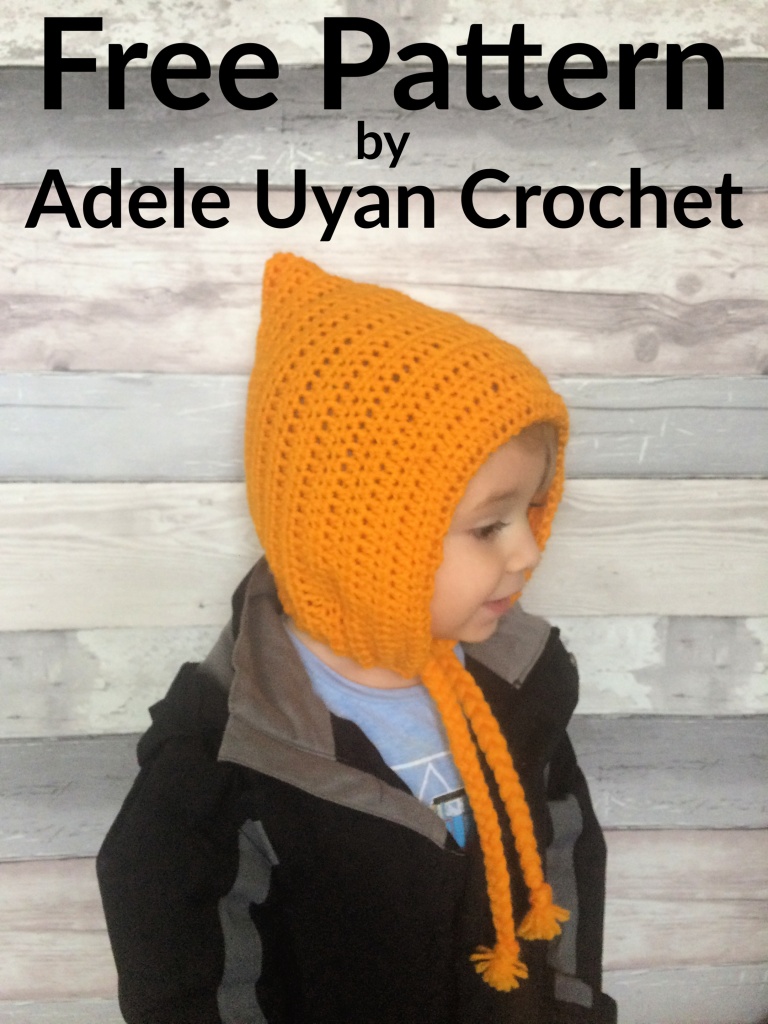
Is it even possible for a child to wear a pixie hat and not look the cutest they’ve ever looked? This pixie hat will keep little ears warm and can be tied to make sure it won’t fall off (or be pulled off).
This pattern should be suitable for beginners.
This pattern was originally for 3-10 years, but I decided to add instructions to make the hat to fit 0-1 years aswell. You can easily size up or down as needed to get the look and fit you want.
I crochet quite tightly so you may need to play around with hook sizes to get the required hat size. My finished 0-1y hat is 6.5” wide and 7.5” tall and the finished 3-10y hat is 8.5″ wide and 9″ tall. That means you need a starting rectangle of around 14” x 6.5” for 0-1 years and 17″ x 8.5″ for 3-10 years.
To make your own braided pixie hat, you will need double knit yarn in the colour of your choice. You will also need a 4mm (0-1y) or 6mm (3-10y) crochet hook, a tape measure, a pair of scissors and a yarn needle.
Braided Pixie Hat (Free Crochet Pattern)
Main:
1. ch62, hdc in 3rd ch from hook and across (60)
2-21. ch2, turn, hdc in st at base of ch and across (60)
22. fold in half lengthwise to make a bonnet shape, slip stitch the back together then bind off and turn the seam to the inside of the hat
Neck:
1. with wrong side facing, join yarn in bottom corner st, ch1, sc in same st and each row across (42)
2. ch1, turn, *sc in next 2sts, sc2tog*, repeat from *-* across to last 2sts, sc in last 2sts (32)
3-4. ch1, turn, sc across (32)
5. do not ch or turn, work a second sc in corner st, *sc in next st, sc2tog*, repeat from *-* across front to end, sc in same space as first st on neck, join with slst to first st on neck, bind off and weave in all ends
Braids:
cut 12 lengths of yarn measuring 25-30″ each
find the corner of the hat, at the front, and thread the 12 lengths through, hanging half of the length either side of the hole, so you end up with 24 strands of yarn
braid the strands together in groups of 8
tie off with a knot at the bottom and trim the ends
repeat on the other side of the hat
I hope you enjoyed making this cute crochet pixie hat. I would love to see any hats you make using this pattern. Feel free to tag me on social media (@adeleuyancrochet) so I can see them! Or why not join our Facebook group to show off your creations. Happy crocheting.
Processing…
Success! You're on the list.
Whoops! There was an error and we couldn't process your subscription. Please reload the page and try again.
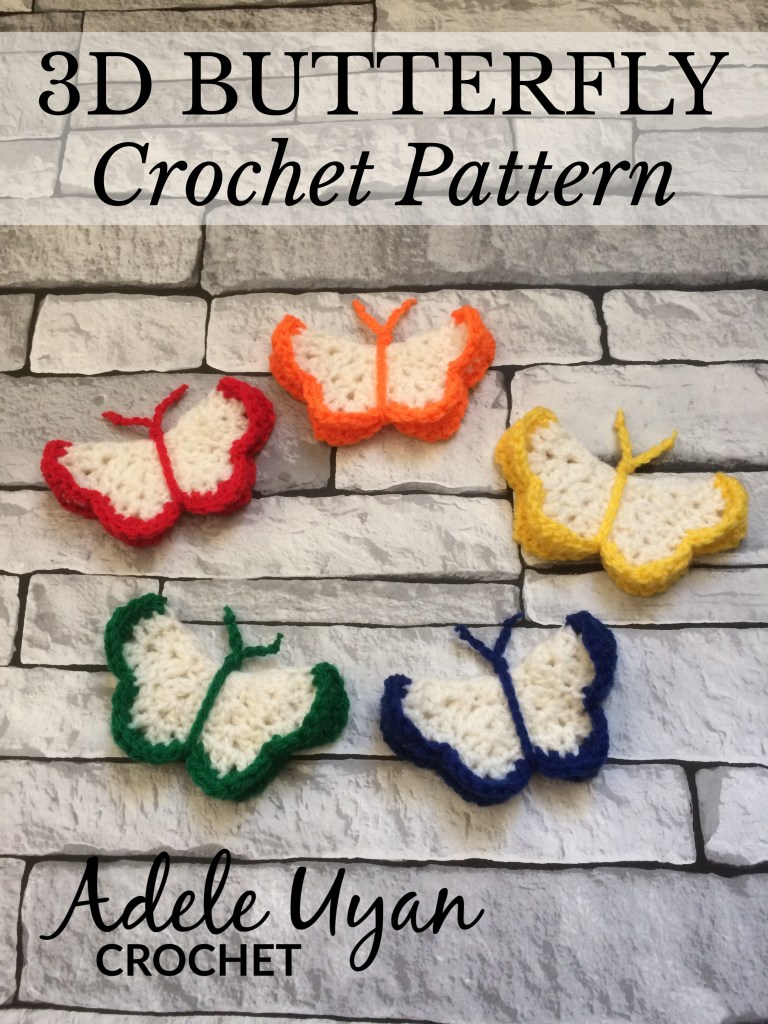
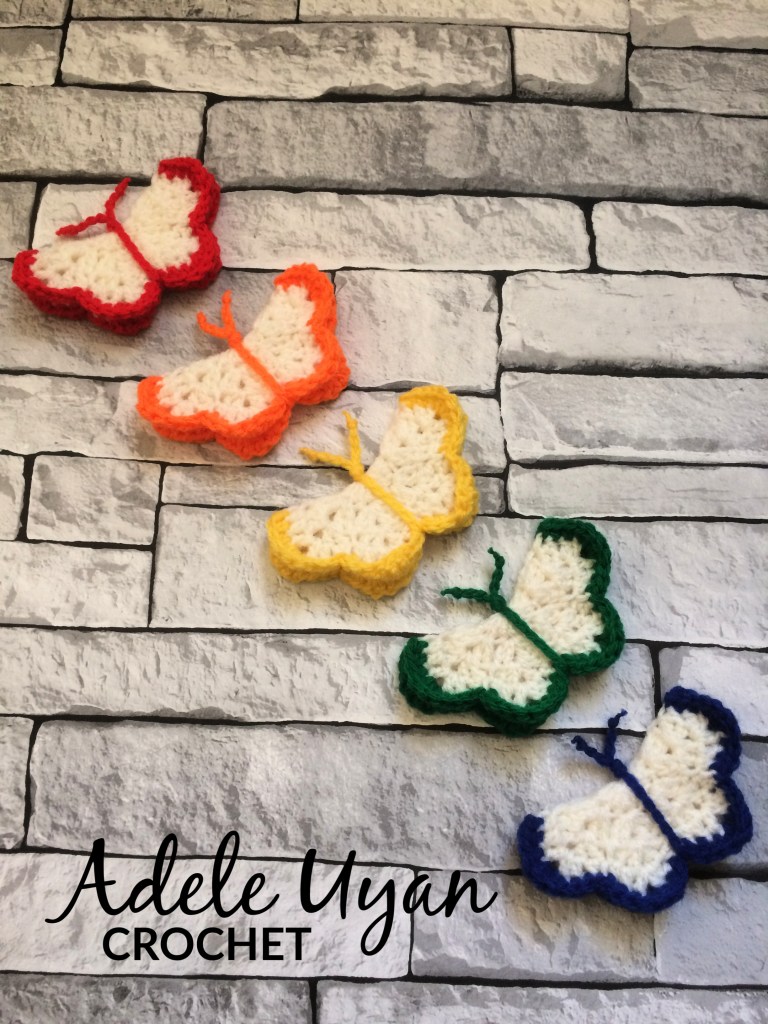
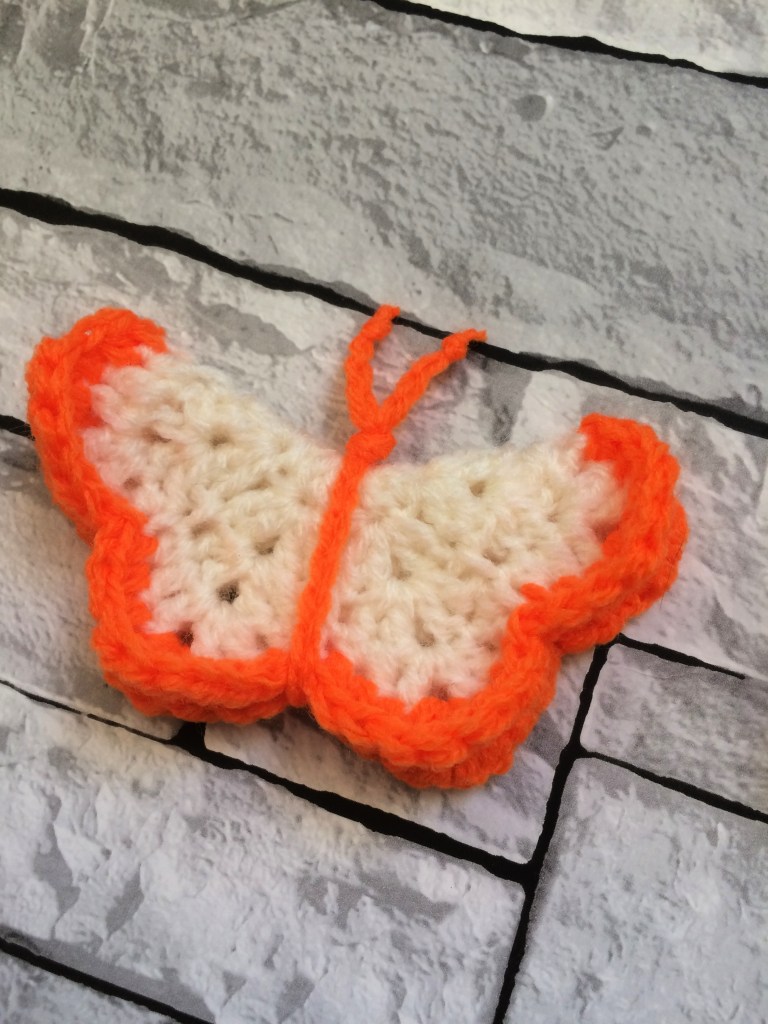
I first made a little 3D butterfly about 5 years ago, for a yarn bombing project I was taking part in with my local crochet group. We all made lots of flowers and butterflies and decorated a wall in the town centre with them. It looked amazing! I recently tried to follow the pattern that I wrote back then and, as I wasn’t as experienced in pattern writing back then, it seemed unnecessarily complicated. I found myself getting frustrated with the pattern so I decided to update it. This is the updated pattern, easier and quicker to make but the end butterfly is still almost identical.
If you would like to make your own, you will need a 4mm crochet hook and DK yarns in a main colour and a contrasting colour. You will also need a pair of scissors, a stitch marker and a yarn needle.
3D Butterfly (Free Crochet Pattern)
Wings:
1. with main colour yarn, make a magic loop, ch2, work 16dcs in loop, join with slst in top of 1st dc, pull centre yarn tail tightly to close loop (16)
2. ch2, do not turn, 2dcs in st at base of ch, ch1, 2dcs in same st, sk1st, *(2dcs, ch1, 2dcs) in next st, sk1st*, repeat from *-* to end, join with slst in top of 1st dc
3. do not ch or turn, place stitch marker under join st, *2dcs in next chsp, ch1, 2dcs in same chsp, slst inbetween previous row’s shells*, repeat from *-* to end, join with slst in top of 1st dc
4. ch1, do not turn, hdc in st at base of ch, dc in next st, (dc, ch1, dc) in chsp, dc in next st, hdc in next st, slst in previous row’s slst, *hdc in next st, dc in next st, (dc, ch1, dc) in chsp, dc in next st, hdc in next st, slst in previous row’s slst*, repeat from *-* to end, join with slst in top of 1st hdc
5. join contrasting colour yarn, ch1, do not turn, *hdc in 3sts, 3dcs in chsp, hdc in 3sts, slst in previous row’s slst*, repeat from *-* to end, join with slst in top of 1st hdc, bind off and weave in ends
Body:
1.with contrasting colour yarn, ch36, bind off, fold butterfly in half and wrap body around wings, tie at the top of the wings to secure, tie a knot in the top of each antennae and weave in ends
I hope you enjoyed making this little 3D crochet butterfly. I would love to see any butterflies you make using this pattern. Feel free to tag me on social media (@adeleuyancrochet) so I can see them! Or why not join our Facebook group to show off your creations. Happy crocheting.
Processing…
Success! You're on the list.
Whoops! There was an error and we couldn't process your subscription. Please reload the page and try again.
I first made a pair of these little sandals when my middle child was a newborn, so 9 years ago! Since then, I have made hundreds of these little sandals. They are very well received as a new baby or baby shower present.
This pattern should be suitable for beginners. If you do not yet know how to crochet, you can find a basic how to crochet video here.
Big Bow Baby Sandals (Free Crochet Pattern)
I have included instructions for preemie, newborn, 0-3months and 3-6months. The sandals are not suitable for babies who are cruising or walking.
I tend to crochet quite tightly so you may need to adjust your crochet hook size or yarn thickness to achieve the correct sole size. Try with the recommended crochet hook size and DK yarn first, then scale up or down from there.
The sole on the finished sandal should be 3.75″ long for preemie, 4.25″ long for newborn, 4.5″ long for 0-3months or 4.75″ long for 3-6months.
For this free crochet pattern, you will need double knit yarn in the colours of your choice. You will also need a 4mm crochet hook, a tape measure, a pair of scissors and a yarn needle.
Preemie (3.75″ to fit up to 3″ foot length)
Sole:
ch12, 4hdcs in 3rd ch from hook, hdc in next 8sts, 4hdcs in last st, (turn to work along opposite side of the ch) hdc in next 8sts, join with slst in 1st hdc (24)
ch2, turn, 2hdcs in same st as ch, hdc in next 7sts, work 2hdcs in each of next 5sts, hdc in next 7sts, work 2hdcs in each of next 4sts, join with slst in top of 1st hdc (34)
ch1, turn, 2scs in same st as ch, work 2scs in each of the next 6sts, sc in 10sts, work 2scs in each of the next 7sts, sc in 10sts, join with slst in top of 1st sc, bind off (48)
Front Strap:
with wrong side facing, join yarn in 8th st, counting left from bind off st, ch1, sc in same st and next 3sts (4)
ch1, turn, sc across (4)
repeat row 2 a further 8 times
bind off, leaving a long tail to stitch strap to other side of sandal
Back Strap:
with wrong side facing, ignore the st at the base of bind off st then join yarn in 8th st, counting right from bind off st, ch1, sc in same st and next 4sts (5)
ch1, turn, sc across (5)
repeat row 2 a further 6 times
bind off, leaving a long tail to stitch strap to sole
Bow:
ch7, sc in 2nd ch from hook and across (6)
ch1, turn, sc across (6)
repeat row 2 a further 17 times
bind off, leaving a long tail
fold the bow in half to make a 2″ rectangle then stitch together with the tail, gather the centre of the bow tightly with yarn, then secure and weave in ends
Finishing:
use the tail to attach the front strap to the opposite side of the sandal
fold the back strap down backwards and stitch last row of strap to first row of strap to create a channel for the ribbon
weave in all ends
stitch bow to front strap
cut a piece of thin ribbon, long enough to go around baby’s ankle with spare to tie a bow, heat seal the edges
insert ribbon into back strap channel and stitch in place for safety
Newborn (4.25″ to fit up to 3.5″ foot length)
Sole:
ch12, 4hdcs in 3rd ch from hook, hdc in next 8sts, 4hdcs in last st, (turn to work along opposite side of the ch) hdc in next 8sts, join with slst in 1st hdc (24)
ch2, turn, 2hdcs in same st as ch, hdc in next 7sts, work 2hdcs in each of next 5sts, hdc in next 7sts, work 2hdcs in each of next 4sts, join with slst in top of 1st hdc (34)
ch2, turn, 2hdcs in same st as ch, work 2hdcs in each of the next 6sts, hdc in 10sts, work 2hdcs in each of the next 7sts, hdc in 10sts, join with slst in top of 1st hdc, bind off (48)
Front Strap:
with wrong side facing, join yarn in 8th st, counting left from bind off st, ch1, sc in same st and next 3sts (4)
ch1, turn, sc across (4)
repeat row 2 a further 8 times
bind off, leaving a long tail to stitch strap to other side of sandal
Back Strap:
with wrong side facing, ignore the st at the base of bind off st then join yarn in 9th st, counting right from bind off st, ch1, sc in same st and next 5sts (6)
ch1, turn, sc across (6)
repeat row 2 a further 6 times
bind off, leaving a long tail to stitch strap to sole
Bow:
ch7, sc in 2nd ch from hook and across (6)
ch1, turn, sc across (6)
repeat row 2 a further 17 times
bind off, leaving a long tail
fold the bow in half to make a 2″ rectangle then stitch together with the tail, gather the centre of the bow tightly with yarn, then secure and weave in ends
Finishing:
use the tail to attach the front strap to the opposite side of the sandal
fold the back strap down backwards and stitch last row of strap to first row of strap to create a channel for the ribbon
weave in all ends
stitch bow to front strap
cut a piece of thin ribbon, long enough to go around baby’s ankle with spare to tie a bow, heat seal the edges
insert ribbon into back strap channel and stitch in place for safety
0-3m (4.5″ to fit up to 3.75″ foot length)
Sole:
ch14, 4hdcs in 3rd ch from hook, hdc in next 10sts, 4hdcs in last st, (turn to work along opposite side of the ch) hdc in next 10sts, join with slst in 1st hdc (28)
ch2, turn, 2hdcs in same st as ch, hdc in next 9sts, work 2hdcs in each of next 5sts, hdc in next 9sts, work 2hdcs in each of next 4sts, join with slst in top of 1st hdc (38)
ch2, turn, 2hdcs in same st as ch, work 2hdcs in each of the next 6sts, hdc in 12sts, work 2hdcs in each of the next 7sts, hdc in 12sts, join with slst in top of 1st hdc, bind off (52)
Front Strap:
with wrong side facing, join yarn in 9th st, counting left from bind off st, ch1, sc in same st and next 3sts (4)
ch1, turn, sc across (4)
repeat row 2 a further 9 times
bind off, leaving a long tail to stitch strap to other side of sandal
Back Strap:
with wrong side facing, ignore the st at the base of bind off st then join yarn in 9th st, counting right from bind off st, ch1, sc in same st and next 5sts (6)
ch1, turn, sc across (6)
repeat row 2 a further 6 times
bind off, leaving a long tail to stitch strap to sole
Bow:
ch7, sc in 2nd ch from hook and across (6)
ch1, turn, sc across (6)
repeat row 2 a further 17 times
bind off, leaving a long tail
fold the bow in half to make a 2″ rectangle then stitch together with the tail, gather the centre of the bow tightly with yarn, then secure and weave in ends
Finishing:
use the tail to attach the front strap to the opposite side of the sandal
fold the back strap down backwards and stitch last row of strap to first row of strap to create a channel for the ribbon
weave in all ends
stitch bow to front strap
cut a piece of thin ribbon, long enough to go around baby’s ankle with spare to tie a bow, heat seal the edges
insert ribbon into back strap channel and stitch in place for safety
3-6m (4.75″ to fit up to 4″ foot length)
Sole:
ch16, 4hdcs in 3rd ch from hook, hdc in next 12sts, 4hdcs in last st, (turn to work along opposite side of the ch) hdc in next 12sts, join with slst in 1st hdc (32)
ch2, turn, 2hdcs in same st as ch, hdc in next 11sts, work 2hdcs in each of next 5sts, hdc in next 11sts, work 2hdcs in each of next 4sts, join with slst in top of 1st hdc (42)
ch2, turn, 2hdcs in same st as ch, work 2hdcs in each of the next 6sts, hdc in 14sts, work 2hdcs in each of the next 7sts, hdc in 14sts, join with slst in top of 1st hdc, bind off (56)
Front Strap:
with wrong side facing, join yarn in 11th st, counting left from bind off st, ch1, sc in same st and next 3sts (4)
ch1, turn, sc across (4)
repeat row 2 a further 9 times
bind off, leaving a long tail to stitch strap to other side of sandal
Back Strap:
with wrong side facing, ignore the st at the base of bind off st then join yarn in 9th st, counting right from bind off st, ch1, sc in same st and next 5sts (6)
ch1, turn, sc across (6)
repeat row 2 a further 6 times
bind off, leaving a long tail to stitch strap to sole
Bow:
ch7, sc in 2nd ch from hook and across (6)
ch1, turn, sc across (6)
repeat row 2 a further 17 times
bind off, leaving a long tail
fold the bow in half to make a 2″ rectangle then stitch together with the tail, gather the centre of the bow tightly with yarn, then secure and weave in ends
Finishing:
use the tail to attach the front strap to the opposite side of the sandal
fold the back strap down backwards and stitch last row of strap to first row of strap to create a channel for the ribbon
weave in all ends
stitch bow to front strap
cut a piece of thin ribbon, long enough to go around baby’s ankle with spare to tie a bow, heat seal the edges
insert ribbon into back strap channel and stitch in place for safety
I hope you enjoyed this free crochet pattern and make many pairs of little baby sandals. Feel free to tag me on social media (@adeleuyancrochet) with any of your makes from my patterns. I always love to see your work. Or why not join our Facebook group to show off your creations. Happy crocheting!
Processing…
Success! You're on the list.
Whoops! There was an error and we couldn't process your subscription. Please reload the page and try again.
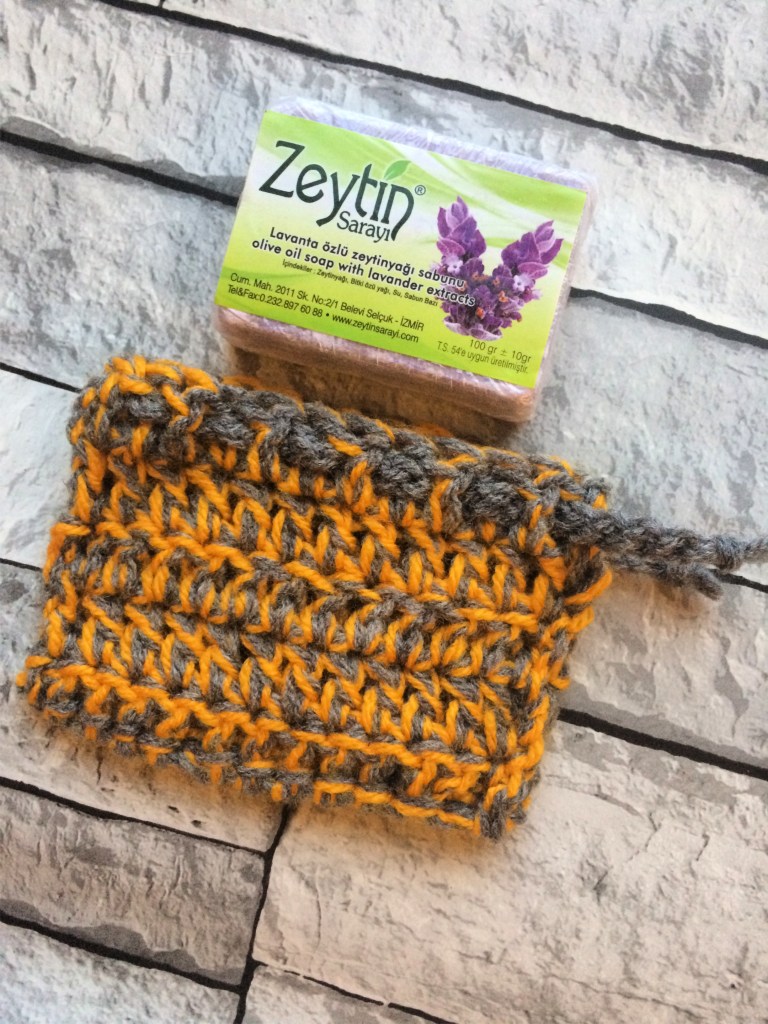
Don’t you just love giving handmade gifts for Christmas and birthdays. I do! I know how much time and effort goes into making them so I always appreciate handmade gifts. I have made this bath set for several of my family and friends for different occasions over the years. It makes a lovely little gift set if paired with a bottle of bubble bath and a bar of soap.
This pattern should be suitable for beginners. If you do not yet know how to crochet, you can find a basic how to crochet video here.
If you would like to make your own, you will need a 6mm crochet hook and DK yarn. You will also need a pair of scissors and a yarn needle.
Free Crochet Bath Set Pattern
Bath Puff
Main:
with two strands DK yarn held together, make a magic ring, ch2, work 10dcs in ring, join with slst in top of 1st dc, do not pull the centre tight (10)
ch2, turn, 3hdcs in each st around, join with slst in top of 1st hdc (30)
ch2, turn, 2dcs in each st around, join with slst in top of 1st dc
repeat rounds 1-3 five more times
weave in outside ends but not magic ring ends
Tie:
with two strands DK yarn held together, ch60, slst in 2nd ch from hook and across
bind off and weave in ends
fold the tie in half and tie a knot at the bottom to form a loop
loosen magic rings on each piece of bath puff and push the knot through, repeat until all six pieces are on the tie
weave in the magic ring ends, pulling tightly closed around the tie
push the bath puff pieces down firmly and tie a knot at the top, making sure bath puff pieces are still tightly squashed together
Soap Bag
Main:
with two strands DK yarn held together, ch14, dc in 3rd ch from hook and across (12)
ch2, turn, dc in st at base of ch and across (12)
repeat row 2 eight times or until work measures 7″
fold in half along long edge then work slst down one side, across the bottom and up the other side to make a bag
bind off and weave in ends
Tie:
with one strand DK, ch50, slst in 2nd ch from hook and across
bind off and weave in ends
weave through the top row on the soap bag and knot each end
add soap and pull tie tight to close
I hope you enjoyed making this crochet bath set. I would love to see any sets you make using this pattern. Feel free to tag me on social media (@adeleuyancrochet) so I can see them! Or why not join our Facebook group to show off your creations. Happy crocheting.
Processing…
Success! You're on the list.
Whoops! There was an error and we couldn't process your subscription. Please reload the page and try again.
I have been crocheting for the past 11 years and really enjoy it. It is one of my favourite ways to relax. Being sat in front of a good film with a ball of yarn and a crochet hook sounds like the perfect night to me.
I started writing my own patterns not long after I learned to crochet. I found that when I followed other people’s patterns, I would forever be adjusting here and then to make the final outcome the way I wanted it to be.
In the end, it became easier for me to just write my own patterns than to find and adjust a similar pattern. These days, pattern writing is second nature to me, and I wanted to share that with you.
If you make anything using one of my patterns, I would love to see it. Why not join our Facebook group to show off your creations!
By clicking submit, you agree to share your email address with the site owner and Mailchimp to receive marketing, updates, and other emails from the site owner. Use the unsubscribe link in those emails to opt out at any time.