Child’s Bow Tie (Free Crochet Pattern)

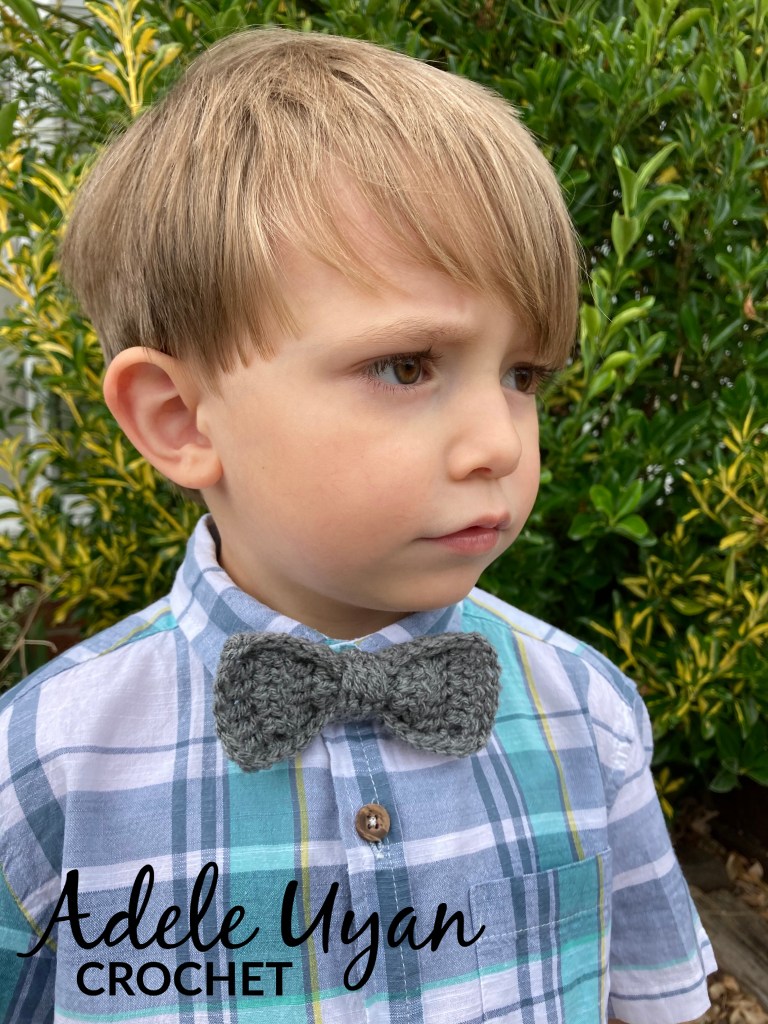
We have a family party coming up this month and I wanted to make my son a little bow tie to wear over his shirt, to make him look a little smarter. I adore the bow tie and shirt trend, especially on children, so this is definitely not a new look for him. He has several different colours of bow tie but none that matched with the specific shirt I wanted him to wear. As I was making the bow tie, I decided to write the pattern down for you all so you could make your own if you wanted to.

To make your own child’s crochet bow tie, you will need a 4mm hook, double knit or light worsted yarn and a small button. This size of bow tie fits my 4 year old son well. It can easily be made to fit smaller or larger children, by adding or removing rows from the neck strap. This pattern is written using American terminology.

Child’s Bow Tie (Free Crochet Pattern)

Bow:

1. ch8, dc in 3rd chain from hook and across (6)

2-16. ch2, turn, dc in same stitch as chain and across (6)

17. ch1, fold in half, sc around, working through both edges to close, join with slst in top of 1st sc, bind off and weave in ends

Neck Strap:

1. ch5, dc in 3rd chain from hook and across (3)

2-26. ch2, turn, dc in same stitch as chain and across (3)

27. ch1, turn, sc in same stitch as chain, ch1, skip 1 stitch, sc in last stitch

28. ch1, turn, sc in same stitch as chain, sc in chain space, sc in last stitch, bind off and weave in ends (3)

Bow Centre:

1. ch5, dc in 3rd chain from hook and across (3)

2-4. ch2, turn, dc in same stitch as chain and across (3)

5. bind off, leaving a long tail to join
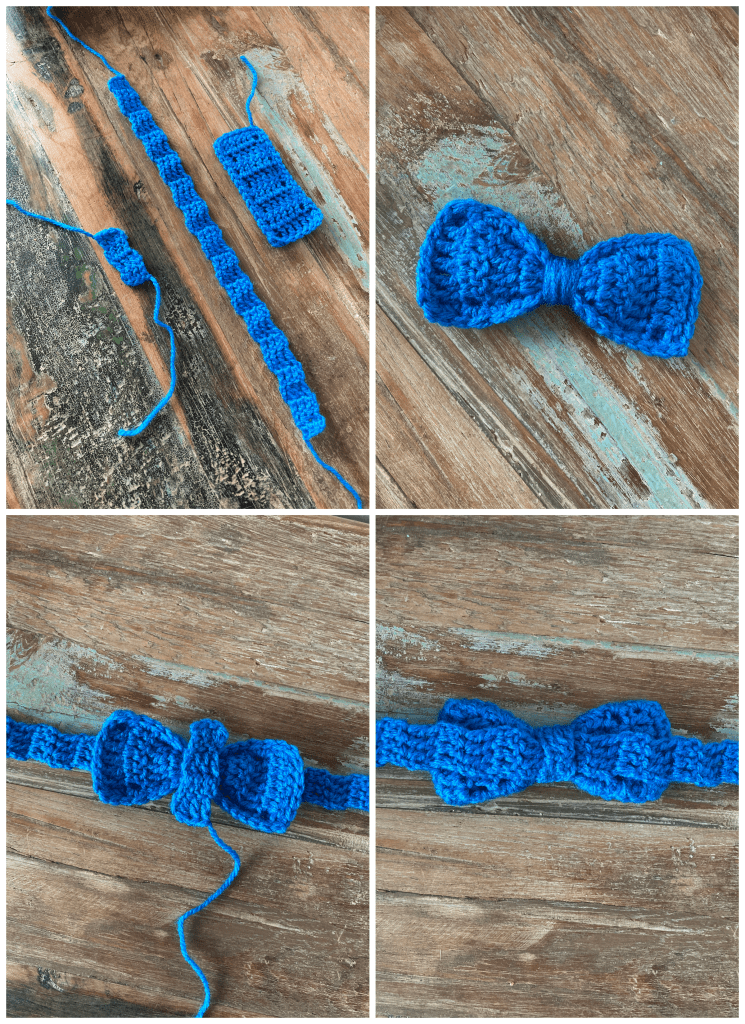
Finishing:

1. take the main bow piece and gather the very centre with a piece of matching yarn, tie it off tightly to give the bow a nice shape and weave the ends in

2. lay the gathered bow on top of the neck strap and cover with the bow centre, stitch the two pieces of bow centre together, using the long tail that you left, with the bow and neck strap neatly inside, bind off and weave in ends

3. attach a small button to the end of the neck strap without the buttonhole

I hope you like this free pattern. Please do let me know if you do make one of your own so I can see it. You can tag me on social media (@adeleuyancrochet) or why not join our Facebook group so we can all see!

Processing…
Success! You're on the list.

Crochet Slippers (Free Pattern)

Whenever I get the urge to crochet something, I usually prefer to make something quick and easy. Because of that, I tend to crochet more for babies and children than I do for adults. This week I needed a quick crochet project to give as a gift and I racked my brains to think of something I could make to gift to an adult. I finally remembered some slippers I had made a few years ago, and luckily I had written the pattern down! They are very quick and very easy so perfect for someone like me. I love that they fit so many different sizes aswell so one pattern is all you need to make slippers for most adults. This pattern makes slippers that will fit from a UK size 4 to a UK size 7 (I think that is 6.5 to 9.5 in American shoe sizes and 37 to 40 in European shoe sizes).

To make your own slippers, you will need a 3mm crochet hook, a 5mm crochet hook, some double knit yarn, a tape measure, a pair of scissors and a yarn needle.

Crochet Slippers (Free Pattern)

Toe:

With 5mm hook and two strands DK yarn held together –

1. ch10, 2scs in 2nd ch from hook, sc in next 7sts, 2scs in last st, turn the work to crochet up the other side of the foundation chain, sc in next 7sts, join with slst in top of 1st sc (18)

2. ch1, turn, hdc in next 8sts, 2hdcs in next st, hdc in next 8sts, 2hdcs in next st, join with slst in top of 1st hdc (20)

3. ch1, turn, hdc in next st, 2hdcs in next st, hdc in next 9sts, 2hdcs in next st, hdc in next 8sts, join with slst in top of 1st hdc (22)

4. ch1, turn, hdc in next 10sts, 2hdcs in next st, hdc in next 10sts, 2hdcs in next st, join with slst in top of 1st hdc (24)

5. ch1, turn, hdc in next st, 2hdcs in next st, hdc in next 11sts, 2hdcs in next st, hdc in next 10sts, join with slst in top of 1st hdc (26)

6. ch1, turn, hdc in next 11sts, 2hdcs in next st, hdc in next 12sts, 2hdcs in next st, hdc in next st, join with slst in top of 1st hdc (28)

7-9. ch1, turn, hdc in each st around, join with slst in top of 1st hdc (28)

10. bind off

Foot:

1. with wrong side facing, skip st at base of bind off st then count 7sts to the right, join yarn, ch1, hdc in same st and next 22sts (23)

2-13. ch1, turn, hdc in each st across (23)

14. bind off, leaving a long tail, fold the back with right sides together and stitch together to form the heel

Finishing:

1. with right side facing, join yarn at the back seam, ch1, sc in same st and evenly around, join with slst in top of 1st sc (33)

2. ch1, turn, sc in same st, ch2, sk1st, *sc in next st, ch2, sk1st*, repeat from *-* around to end, sc in last st, ch2, join with slst in top of 1st sc

3. ch1, turn, sc in each chsp and st around, join with slst in top of 1st sc (33)

4. bind off and weave in ends

Tie:

With 5mm hook and one strand DK yarn –

1. ch100, sc in 2nd ch from hook and across, bind off and weave in ends (99)

2. thread through the holes made in the top of the slipper and tie off in a bow

Flower:

With 3mm hook and one strand DK yarn –

1. with contrasting yarn, make a magic loop, ch2, work 16 dcs into loop, join with slst in top of 1st dc (16)

2. ch1, do not turn, sc in same st, *ch4, sk 1st, sc in next st*, rep *-* until last st, ch4, join with slst in top of 1st sc

3. ch1, do not turn, *work sc, hdc, dc, trc, dc, hdc, sc, all into one chain space*, rep *-* around, join with a slst in top of 1st sc, bind off

4. join main yarn in one of the skipped stitches on round 2, ch1, sc in same st, *ch3, sc in next skipped stitch*, rep from *-* around, ch3, join with slst in top of 1st sc

5. ch1, do not turn, *work sc, hdc, dc, hdc, sc, all into one chain space*, rep *-* around, join with slst in top of 1st sc, bind off, weave in ends then stitch to front of slipper

I hope you found this pattern useful and make lots of pairs of pretty slippers. If you make anything using one of my patterns, I would love to see it. You can tag me on social media (@adeleuyancrochet) or why not join our Facebook group to show off your creations.

Processing…
Success! You're on the list.

Mimie’s Big Bow Sandals (Free Crochet Pattern)

I first made a pair of these little sandals when my middle child was a newborn, so 9 years ago! Since then, I have made hundreds of these little sandals. They are very well received as a new baby or baby shower present.

This pattern should be suitable for beginners. If you do not yet know how to crochet, you can find a basic how to crochet video here.

Big Bow Baby Sandals (Free Crochet Pattern)

I have included instructions for preemie, newborn, 0-3months and 3-6months. The sandals are not suitable for babies who are cruising or walking.

I tend to crochet quite tightly so you may need to adjust your crochet hook size or yarn thickness to achieve the correct sole size. Try with the recommended crochet hook size and DK yarn first, then scale up or down from there.

The sole on the finished sandal should be 3.75″ long for preemie, 4.25″ long for newborn, 4.5″ long for 0-3months or 4.75″ long for 3-6months.

For this free crochet pattern, you will need double knit yarn in the colours of your choice. You will also need a 4mm crochet hook, a tape measure, a pair of scissors and a yarn needle.

Preemie (3.75″ to fit up to 3″ foot length)

Sole:

  1. ch12, 4hdcs in 3rd ch from hook, hdc in next 8sts, 4hdcs in last st, (turn to work along opposite side of the ch) hdc in next 8sts, join with slst in 1st hdc (24)
  2. ch2, turn, 2hdcs in same st as ch, hdc in next 7sts, work 2hdcs in each of next 5sts, hdc in next 7sts, work 2hdcs in each of next 4sts, join with slst in top of 1st hdc (34)
  3. ch1, turn, 2scs in same st as ch, work 2scs in each of the next 6sts, sc in 10sts, work 2scs in each of the next 7sts, sc in 10sts, join with slst in top of 1st sc, bind off (48)

Front Strap:

  1. with wrong side facing, join yarn in 8th st, counting left from bind off st, ch1, sc in same st and next 3sts (4)
  2. ch1, turn, sc across (4)
  3. repeat row 2 a further 8 times
  4. bind off, leaving a long tail to stitch strap to other side of sandal

Back Strap:

  1. with wrong side facing, ignore the st at the base of bind off st then join yarn in 8th st, counting right from bind off st, ch1, sc in same st and next 4sts (5)
  2. ch1, turn, sc across (5)
  3. repeat row 2 a further 6 times
  4. bind off, leaving a long tail to stitch strap to sole

Bow:

  1. ch7, sc in 2nd ch from hook and across (6)
  2. ch1, turn, sc across (6)
  3. repeat row 2 a further 17 times
  4. bind off, leaving a long tail
  5. fold the bow in half to make a 2″ rectangle then stitch together with the tail, gather the centre of the bow tightly with yarn, then secure and weave in ends

Finishing:

  1. use the tail to attach the front strap to the opposite side of the sandal
  2. fold the back strap down backwards and stitch last row of strap to first row of strap to create a channel for the ribbon
  3. weave in all ends
  4. stitch bow to front strap
  5. cut a piece of thin ribbon, long enough to go around baby’s ankle with spare to tie a bow, heat seal the edges
  6. insert ribbon into back strap channel and stitch in place for safety

Newborn (4.25″ to fit up to 3.5″ foot length)

Sole:

  1. ch12, 4hdcs in 3rd ch from hook, hdc in next 8sts, 4hdcs in last st, (turn to work along opposite side of the ch) hdc in next 8sts, join with slst in 1st hdc (24)
  2. ch2, turn, 2hdcs in same st as ch, hdc in next 7sts, work 2hdcs in each of next 5sts, hdc in next 7sts, work 2hdcs in each of next 4sts, join with slst in top of 1st hdc (34)
  3. ch2, turn, 2hdcs in same st as ch, work 2hdcs in each of the next 6sts, hdc in 10sts, work 2hdcs in each of the next 7sts, hdc in 10sts, join with slst in top of 1st hdc, bind off (48)

Front Strap:

  1. with wrong side facing, join yarn in 8th st, counting left from bind off st, ch1, sc in same st and next 3sts (4)
  2. ch1, turn, sc across (4)
  3. repeat row 2 a further 8 times
  4. bind off, leaving a long tail to stitch strap to other side of sandal

Back Strap:

  1. with wrong side facing, ignore the st at the base of bind off st then join yarn in 9th st, counting right from bind off st, ch1, sc in same st and next 5sts (6)
  2. ch1, turn, sc across (6)
  3. repeat row 2 a further 6 times
  4. bind off, leaving a long tail to stitch strap to sole

Bow:

  1. ch7, sc in 2nd ch from hook and across (6)
  2. ch1, turn, sc across (6)
  3. repeat row 2 a further 17 times
  4. bind off, leaving a long tail
  5. fold the bow in half to make a 2″ rectangle then stitch together with the tail, gather the centre of the bow tightly with yarn, then secure and weave in ends

Finishing:

  1. use the tail to attach the front strap to the opposite side of the sandal
  2. fold the back strap down backwards and stitch last row of strap to first row of strap to create a channel for the ribbon
  3. weave in all ends
  4. stitch bow to front strap
  5. cut a piece of thin ribbon, long enough to go around baby’s ankle with spare to tie a bow, heat seal the edges
  6. insert ribbon into back strap channel and stitch in place for safety

0-3m (4.5″ to fit up to 3.75″ foot length)

Sole:

  1. ch14, 4hdcs in 3rd ch from hook, hdc in next 10sts, 4hdcs in last st, (turn to work along opposite side of the ch) hdc in next 10sts, join with slst in 1st hdc (28)
  2. ch2, turn, 2hdcs in same st as ch, hdc in next 9sts, work 2hdcs in each of next 5sts, hdc in next 9sts, work 2hdcs in each of next 4sts, join with slst in top of 1st hdc (38)
  3. ch2, turn, 2hdcs in same st as ch, work 2hdcs in each of the next 6sts, hdc in 12sts, work 2hdcs in each of the next 7sts, hdc in 12sts, join with slst in top of 1st hdc, bind off (52)

Front Strap:

  1. with wrong side facing, join yarn in 9th st, counting left from bind off st, ch1, sc in same st and next 3sts (4)
  2. ch1, turn, sc across (4)
  3. repeat row 2 a further 9 times
  4. bind off, leaving a long tail to stitch strap to other side of sandal

Back Strap:

  1. with wrong side facing, ignore the st at the base of bind off st then join yarn in 9th st, counting right from bind off st, ch1, sc in same st and next 5sts (6)
  2. ch1, turn, sc across (6)
  3. repeat row 2 a further 6 times
  4. bind off, leaving a long tail to stitch strap to sole

Bow:

  1. ch7, sc in 2nd ch from hook and across (6)
  2. ch1, turn, sc across (6)
  3. repeat row 2 a further 17 times
  4. bind off, leaving a long tail
  5. fold the bow in half to make a 2″ rectangle then stitch together with the tail, gather the centre of the bow tightly with yarn, then secure and weave in ends

Finishing:

  1. use the tail to attach the front strap to the opposite side of the sandal
  2. fold the back strap down backwards and stitch last row of strap to first row of strap to create a channel for the ribbon
  3. weave in all ends
  4. stitch bow to front strap
  5. cut a piece of thin ribbon, long enough to go around baby’s ankle with spare to tie a bow, heat seal the edges
  6. insert ribbon into back strap channel and stitch in place for safety

3-6m (4.75″ to fit up to 4″ foot length)

Sole:

  1. ch16, 4hdcs in 3rd ch from hook, hdc in next 12sts, 4hdcs in last st, (turn to work along opposite side of the ch) hdc in next 12sts, join with slst in 1st hdc (32)
  2. ch2, turn, 2hdcs in same st as ch, hdc in next 11sts, work 2hdcs in each of next 5sts, hdc in next 11sts, work 2hdcs in each of next 4sts, join with slst in top of 1st hdc (42)
  3. ch2, turn, 2hdcs in same st as ch, work 2hdcs in each of the next 6sts, hdc in 14sts, work 2hdcs in each of the next 7sts, hdc in 14sts, join with slst in top of 1st hdc, bind off (56)

Front Strap:

  1. with wrong side facing, join yarn in 11th st, counting left from bind off st, ch1, sc in same st and next 3sts (4)
  2. ch1, turn, sc across (4)
  3. repeat row 2 a further 9 times
  4. bind off, leaving a long tail to stitch strap to other side of sandal

Back Strap:

  1. with wrong side facing, ignore the st at the base of bind off st then join yarn in 9th st, counting right from bind off st, ch1, sc in same st and next 5sts (6)
  2. ch1, turn, sc across (6)
  3. repeat row 2 a further 6 times
  4. bind off, leaving a long tail to stitch strap to sole

Bow:

  1. ch7, sc in 2nd ch from hook and across (6)
  2. ch1, turn, sc across (6)
  3. repeat row 2 a further 17 times
  4. bind off, leaving a long tail
  5. fold the bow in half to make a 2″ rectangle then stitch together with the tail, gather the centre of the bow tightly with yarn, then secure and weave in ends

Finishing:

  1. use the tail to attach the front strap to the opposite side of the sandal
  2. fold the back strap down backwards and stitch last row of strap to first row of strap to create a channel for the ribbon
  3. weave in all ends
  4. stitch bow to front strap
  5. cut a piece of thin ribbon, long enough to go around baby’s ankle with spare to tie a bow, heat seal the edges
  6. insert ribbon into back strap channel and stitch in place for safety

I hope you enjoyed this free crochet pattern and make many pairs of little baby sandals. Feel free to tag me on social media (@adeleuyancrochet) with any of your makes from my patterns. I always love to see your work. Or why not join our Facebook group to show off your creations. Happy crocheting!

Processing…
Success! You're on the list.