When my children were babies, I received a beautiful knitted matinee cardigan as a gift from their great nan. Ever since then, I have wanted to make a crocheted replica. My eldest is now 12, so this pattern has been trying to get out of my head and onto paper for that long. I finally finished the pattern this week and I am very happy to share it with you.
The baby matinee cardigan is available in sizes newborn to 12 months and is made using double knit yarn. I used a 4mm crochet hook for the body and a 3.5mm crochet hook for the button band. The pattern is suitable for beginners and photo tutorials are provided for some stitches. American terminology is used throughout.
This pattern is now available in my Etsy shop, along with my other PDF crochet patterns and a few things I have handmade to sell. I would love for you to join us in my Facebook group to see more pictures, get feedback and ask any questions you may have.
Processing…
Success! You're on the list.
Whoops! There was an error and we couldn't process your subscription. Please reload the page and try again.
My latest new crochet pattern is this cute Baby Bobble Hoodie. The pattern is currently only available in size newborn but bigger sizes will be added soon and the pattern will be updated. I know that this pattern has been highly anticipated so I wanted to get it out as quickly as possible for you.
The hoodie is made using double knit yarn and 5mm and 6mm crochet hooks. The pattern is easy to follow and is suitable for beginners, although basic knowledge of crochet is needed. I have written the pattern using US terminology and I have included photo tutorials for some of the less common stitches.
I made a really quick video to show how to get started with the hoodie. It is an easy pattern repeat and looks lovely when finished.
You can find the baby bobble hoodie pattern in my Etsy shop, alongside my other PDF patterns. Feel free to join us in my Facebook group to see more pictures, get feedback and ask any questions you may have.
Processing…
Success! You're on the list.
Whoops! There was an error and we couldn't process your subscription. Please reload the page and try again.
This beautiful lacy collared baby cardigan has been a long time in the making. After the release of my Baby Hoodie crochet pattern, I decided to design a more girly pattern to go alongside it. This pattern is currently available in sizes newborn, 0-6m and 6-12m. The collar can be left off if preferred but I think it adds something so sweet to this baby cardigan.
The baby cardigan is made using double knit yarn and a 4mm crochet hook. The pattern is suitable for beginners and uses only basic stitches. American terminology is used throughout.
The lacy collared baby cardigan crochet pattern is available in my Etsy shop, along with my other PDF crochet patterns and a few things I have handmade to sell. Feel free to join us in my Facebook group to see more pictures, get feedback and ask any questions you may have.
Processing…
Success! You're on the list.
Whoops! There was an error and we couldn't process your subscription. Please reload the page and try again.
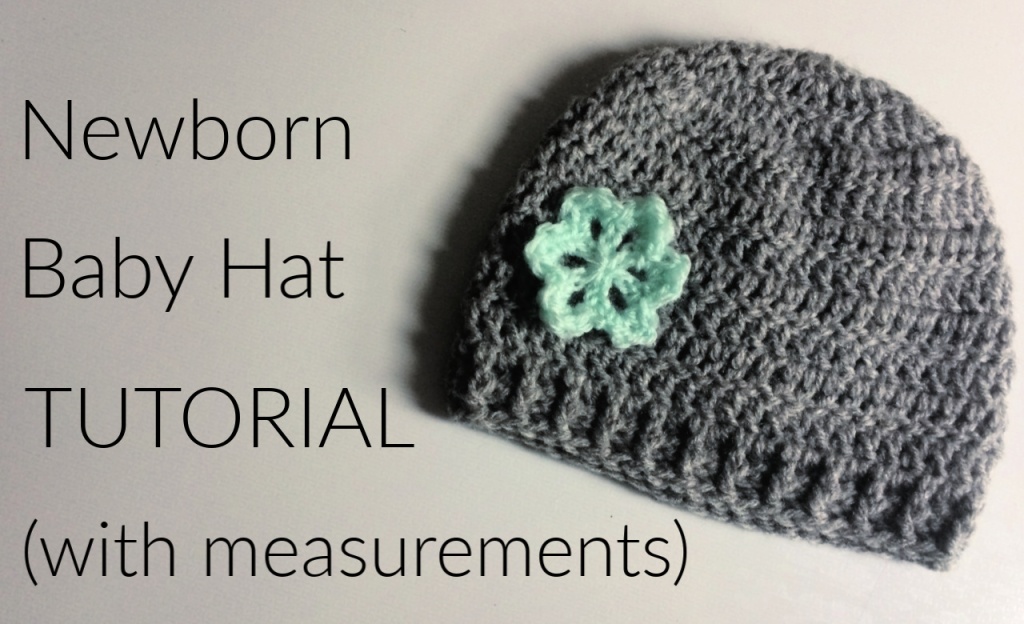
This is the written pattern to go with the video tutorial on my YouTube channel for the crochet newborn baby beanie hat. This hat is sized to fit approx age newborn, or up to a 14.5″ head circumference. I hope it is easy to follow. I have tried to write it up as beginner friendly as possible because this is a perfect first project. It works up quickly and only uses a few stitches so it is a good way to get some practice but still have something wearable for your baby at the end. This hat makes a fantastic new baby gift aswell.
Newborn Baby Beanie Hat (Free Crochet Pattern)
To make this hat you will need a 4.5mm crochet hook and some double knit yarn. I used light grey and mint for the contrasting flower. You will also need a tape measure, a yarn needle and some scissors.
Gauge: At the end of round 4, your hat should measure 3.9″ in diameter. The finished length should be 5.25″.
You will use the following stitches:
ch – chain
dc – double crochet
slst – slip stitch
st – stitch
fpdc – front post double crochet
bpdc – back post double crochet
Hat:
1. make a magic loop, ch3, work 11dcs in loop, join with slst in top of ch3 (12)
2. ch3, turn, dc in same st as ch, work 2dcs in each st around, join with slst in top of ch3 (24)
3. ch3, turn, dc in same st as ch, *dc in next st, 2dcs in next st* repeat from *-* around, end with dc in last st, join with slst in top of ch3 (36)
4. ch3, turn, dc in same st as ch, *dc in next 2sts, 2dcs in next st* repeat from *-* around, end with dc in last 2sts, join with slst in top of ch3 (48)
5-12. ch2, turn, dc in same st as ch and around, join with slst in top of 1st dc (48)
13. ch1, turn, *fpdc, bpdc*, repeat around, join with slst in top of 1st st
14. bind off and weave in ends
Flower:
1. make a magic loop, ch1, work sc in loop, *ch4, work sc in loop*, repeat from *-* four more times, ch4, join with slst in top of 1st sc
2. ch1, turn, work sc, hdc, dc, hdc, sc into each petal chain space around, join with slst in top of 1st sc
3. bind off and weave in ends, attach flower to hat
I hope you find this free pattern useful and make a baby beanie hat of your own. Please let me know if you do make one so I can see your amazing work. You can tag me on social media (@adeleuyancrochet) or better still why not join our Facebook group so we can all see!
Processing…
Success! You're on the list.
Whoops! There was an error and we couldn't process your subscription. Please reload the page and try again.
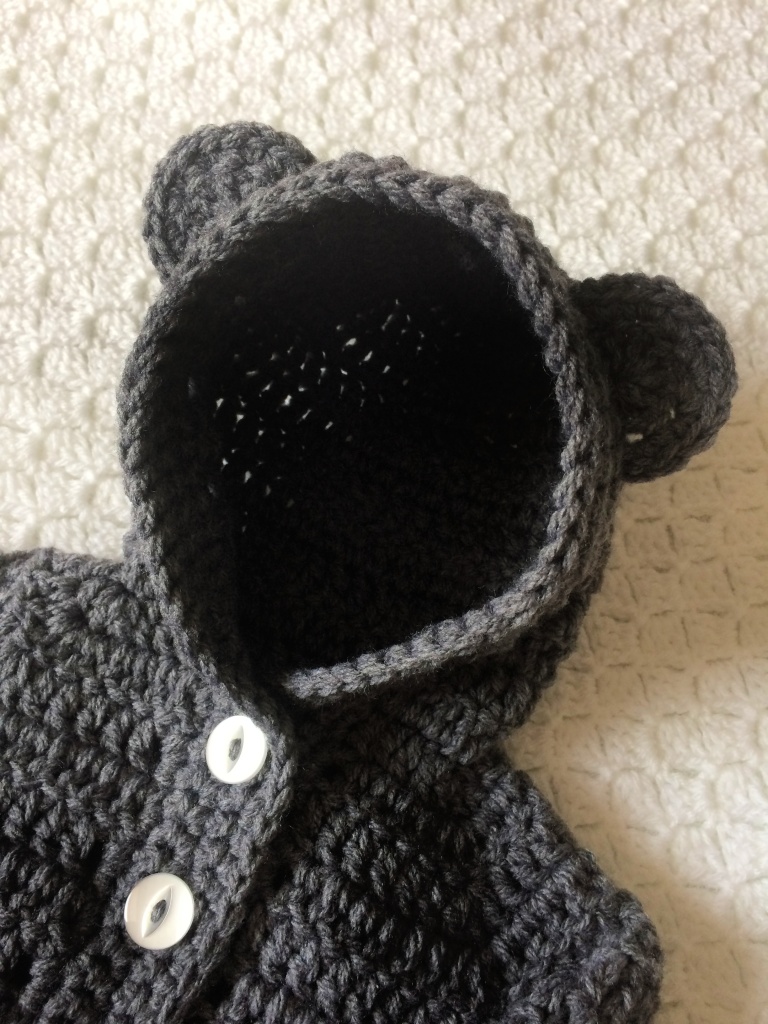
With the weather getting colder, I figured that now is the best time to release my baby hoodie pattern. I have been making these little baby hoodies for as long as I can remember and I finally managed to write my pattern down as a PDF. The pattern is currently available in sizes newborn, 0-6m and 6-12m. More sizes will be released when I have had chance to sit down and write up the PDF for them. I love that this baby hoodie is so cute and cosy. The hoodie can be made without the bear ears, but for me bear ears are always a plus, so they always get added.
The hoodie is made using double knit yarn and two different sized crochet hooks. The pattern is easy to follow and is suitable for beginners, although basic knowledge of crochet is needed. I have written the pattern using US terminology.
You can find the baby hoodie pattern in my Etsy shop, alongside my other PDF patterns and a few things I have crocheted and are ready made for sale. The toddler sized version of this pattern is available here, and for a combined pattern to fit from newborn to 4 years, click here. Feel free to join us in my Facebook group to see more pictures, get feedback and ask any questions you may have.
Processing…
Success! You're on the list.
Whoops! There was an error and we couldn't process your subscription. Please reload the page and try again.
I just finished writing up the pattern for these tiny baby flower sandals, available in sizes preemie, newborn and 0-3m. They are so so small. My children are all older now so I always forget how tiny little baby feet are. I love that the flower on the sandals can be changed for whichever design you prefer. I made a daisy pair and a sunflower pair, but there are so many other possibilities. I wanted to make a pair with cherry blossom flowers, but I recently had a massive yarn destash and now I have ran out of pink yarn. I think they would look gorgeous though.
The crochet baby sandals can be made in the double knitting yarn of your choice, I used acrylic yarn because I had plenty on hand but I just received a big order of cotton yarn, in lots of pretty colours, so I am planning on making some in cotton aswell. US terminology is used throughout the pattern, and a basic knowledge of crochet is assumed. It is an easy pattern, suitable for beginners, and instructions are given for some stitches. To make your own baby sandals, you will need a 3mm crochet hook, a 4mm crochet hook, a 5mm crochet hook, 20g beige double knit yarn, 10g white double knit yarn, 10g double knit yarn in your preferred flower colour, a tape measure, a pair of scissors, a yarn needle and two small buttons.
You can find this pattern in my Etsy shop, with my other PDF patterns and things I have crocheted for sale. Feel free to join us in my Facebook group to see more pictures, get feedback and ask any questions you may have.
Processing…
Success! You're on the list.
Whoops! There was an error and we couldn't process your subscription. Please reload the page and try again.
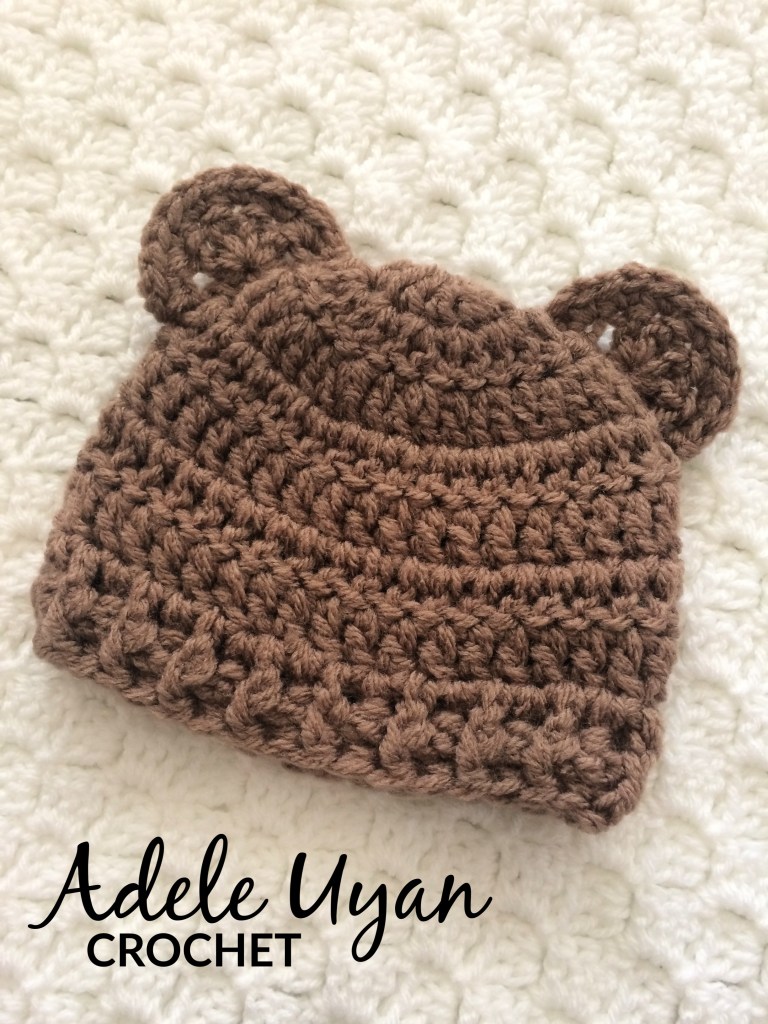
Is there anything cuter than a baby in a baby bear hat? I love how adorable these hats are, especially considering how quick they are to make. This is an easy project so will be perfect for a beginner. The pattern can be used to make a basic beanie aswell, but the bear ears really make the hat for me, so I add them on as many things as possible.
To make your own baby bear hat, you will need a 6mm crochet hook, double knit yarn, a tape measure, a pair of scissors and a yarn needle.
This pattern is for a hat to fit a newborn, with a head circumference of up to 14.5″. At the end of round 3, the hat should measure approximately 4″ in diameter. Please bear in mind that I crochet quite tightly, so you may need to change your hook size to get the right diameter. Use whichever hook you need to get the correct hat size. When you have finished your hat, the length should be around 5.25”. You can add or remove length rows as needed, to get the right size.
Baby Bear Hat (Free Crochet Pattern)
With a 6mm crochet hook and two strands of double knit yarn held together –
1. make a magic loop, ch2, work 12dcs in loop, join with slst in top of 1st dc, pull centre yarn tail tight to close magic loop (12)
2. (inc row) ch2, turn, work 2dcs in st at base of ch and each st around, join with slst in top of 1st dc (24)
3. (inc row) ch2, turn, work 2dcs in st at base of ch, dc in next st, *2dcs in next st, dc in next st*, repeat from – around, join with slst in top of 1st dc (36)
4-8. ch2, turn, work dc in st at base of ch and in each st around, join with slst in top of 1st dc (36)
9. ch1, turn, fpdc around 1st st of previous row, *bpdc around next st of previous row, fpdc around next st of previous row*, repeat from *-* around to end, join with slst in top of 1st fpdc
10. bind off and weave in ends
11. make a magic loop, ch2, work 6dcs in loop, pull centre yarn tail tight to close magic loop (6)
12. ch1, work 2scs in each st across, bind off, leaving a long tail to attach ear to hat (12)
13-14. repeat rows 11-12
15. use the long tail left on the ears to attach them to the hat, I like to attach the ears between the 2nd and 4th rows on the hat
I hope you have enjoyed this free baby bear hat crochet pattern. If you make one, please let me know so I can see your amazing work. You can tag me on social media (@adeleuyancrochet) or why not join our Facebook group to show off your creations.
Processing…
Success! You're on the list.
Whoops! There was an error and we couldn't process your subscription. Please reload the page and try again.
Ever since my babies were born, I have preferred an earflap hat over a basic beanie. I find that an earflap hat keeps little ears warmer, it can be tied on to stop it from falling off, and it tends to fit for longer than a beanie hat. All of my babies have had earflap hats made by me and it is my usual gift for new babies aswell.
A few years ago, I came up with this pattern for an owl earflap hat. Since then, I have made hundreds of hats with it. This hat is really easy to make but it looks like a lot of work went into it. It can be made in a variety of colours to mix it up but looks amazing in neutral colours well.
This pattern is for an owl earflap hat in size newborn. Newborn size will fit up to approximately 14.5″ head circumference. The finished hat has a diameter of 3.9″ and is 4.75″ in height.
To make your own owl earflap hat, you will need approximately 30g double knit yarn, a 3mm crochet hook, a 4mm crochet hook, scissors, a tape measure, scraps of white, black and yellow yarn and a yarn needle.
Crochet Owl Earflap Hat (Free Pattern)
Hat:
1. with a 4mm crochet hook, make a magic loop, ch2, work 12dcs in loop, join with slst in top of 1st dc, pull centre yarn tail tight to close magic loop (12)
2. (inc row) ch2, turn, work
2dcs in st at base of ch and each st around, join with slst in top of
1st
dc (24)
3. (inc row) ch2, turn, work
2dcs in st at base of ch, dc in next st, *2dcs in next st, dc in next
st*, repeat from *-* around, join with slst in top of 1st
dc (36)
4. (inc row) ch2, turn, work
2dcs in st at base of ch, dc in next 2sts, *2dcs in next st, dc in
next 2sts*, repeat from *-* around, join with slst in top of 1st
dc (48)
5-6. ch2,
turn, work dc in st at base of ch and in each st around, join with
slst in top of 1st
dc (48)
7-11. change
to second yarn colour if using, ch2, turn, work dc in st at base of
ch and in each st around, join with slst in top of 1st
dc (48)
12. bind
off and weave in ends
Earflap 1:
1. with
wrong side facing, join yarn in 6th
st from bind off, ch1, sc in same st and next 12sts (13)
2. ch1, turn, sc2tog, sc across
to last 2sts, sc2tog (11)
3. ch1, turn, sc in same st and
across (11)
4. ch1, turn, sc2tog, sc across
to last 2sts, sc2tog (9)
5. ch1, turn, sc in same st and
across (9)
6. ch1, turn, sc2tog, sc across
to last 2sts, sc2tog (7)
7. ch1, turn, sc in same st and
across (7)
8. ch1, turn, sc2tog, sc across
to last 2sts, sc2tog (5)
9. ch1, turn, sc in same st and
across (5)
10. ch1, turn, sc2tog, sc across
to last 2sts, sc2tog (3)
11. ch1, turn, sc in same st and
across (3)
12. bind off and weave in ends
Earflap 2:
1. with
wrong side facing, join yarn in 30th
st from bind off, ch1, sc in same st and next 12sts (13)
2. ch1, turn, sc2tog, sc across
to last 2sts, sc2tog (11)
3. ch1, turn, sc in same st and
across (11)
4. ch1, turn, sc2tog, sc across
to last 2sts, sc2tog (9)
5. ch1, turn, sc in same st and
across (9)
6. ch1, turn, sc2tog, sc across
to last 2sts, sc2tog (7)
7. ch1, turn, sc in same st and
across (7)
8. ch1, turn, sc2tog, sc across
to last 2sts, sc2tog (5)
9. ch1, turn, sc in same st and
across (5)
10. ch1, turn, sc2tog, sc across
to last 2sts, sc2tog (3)
11. ch1, turn, sc in same st and
across (3)
12. bind off and weave in ends
Eyes: make two
1. with black yarn and a 3mm
hook, make a magic loop, ch2, work 12hdcs in loop, join with slst in
top of 1st
hdc, pull centre yarn tail tight to close magic loop (12)
2. (inc row) with colour yarn,
ch2, turn, work 2hdcs in st at base of ch and each st around, join
with slst in top of 1st
hdc (24)
3. (inc row) with white yarn,
ch2, turn, work 2dcs in st at base of ch, dc in next st, *2dcs in
next st, dc in next st*, repeat from *-* around, join with slst in
top of 1st
dc (36)
4. bind off, leaving a long tail
to attach to hat
Beak:
1. with yellow yarn and a 3mm
hook, ch7, sc in 2nd ch from hook and across (6)
2. ch1, turn, sc2tog, sc across
to last 2sts, sc2tog (4)
3. ch1, turn, sc across (4)
4. ch1, turn, sc2tog, sc2tog (2)
5. ch1, turn, sc across (2)
6. ch1, turn, sc2tog, bind off, leaving a long tail to attach to hat
Finishing:
1. with right side facing, join yarn at back, ch1, sc in each st around bottom of hat to bottom corner of 1st earflap, work 2scs in corner st, sc in middle st, ch35, slst in 2nd ch from hook and across, sc again in middle st to secure, work 2scs in corner st, sc around to bottom corner of 2nd earflap, work 2scs in corner st, sc in middle st, ch35, slst in 2nd ch from hook and across, sc again in middle st to secure, work 2scs in corner st, sc around to end, join with slst in 1st st, bind off and weave in ends
2. attach eyes to front of hat
3. attach beak under the eyes
4. to make the ear tassels, cut 6 lengths of yarn 5″ in length then use a crochet hook to pull them through the hat between the 3rd and 4th row, secure with a loop
I hope you enjoyed making this pretty hat. Let me know if you make it. I would love to see your creations on social media. Tag me (@adeleuyancrochet) so I can find it. Or why not join our Facebook group to show off your creations.
What other patterns would you like to see?
Processing…
Success! You're on the list.
Whoops! There was an error and we couldn't process your subscription. Please reload the page and try again.
I first made a pair of these little sandals when my middle child was a newborn, so 9 years ago! Since then, I have made hundreds of these little sandals. They are very well received as a new baby or baby shower present.
This pattern should be suitable for beginners. If you do not yet know how to crochet, you can find a basic how to crochet video here.
Big Bow Baby Sandals (Free Crochet Pattern)
I have included instructions for preemie, newborn, 0-3months and 3-6months. The sandals are not suitable for babies who are cruising or walking.
I tend to crochet quite tightly so you may need to adjust your crochet hook size or yarn thickness to achieve the correct sole size. Try with the recommended crochet hook size and DK yarn first, then scale up or down from there.
The sole on the finished sandal should be 3.75″ long for preemie, 4.25″ long for newborn, 4.5″ long for 0-3months or 4.75″ long for 3-6months.
For this free crochet pattern, you will need double knit yarn in the colours of your choice. You will also need a 4mm crochet hook, a tape measure, a pair of scissors and a yarn needle.
Preemie (3.75″ to fit up to 3″ foot length)
Sole:
ch12, 4hdcs in 3rd ch from hook, hdc in next 8sts, 4hdcs in last st, (turn to work along opposite side of the ch) hdc in next 8sts, join with slst in 1st hdc (24)
ch2, turn, 2hdcs in same st as ch, hdc in next 7sts, work 2hdcs in each of next 5sts, hdc in next 7sts, work 2hdcs in each of next 4sts, join with slst in top of 1st hdc (34)
ch1, turn, 2scs in same st as ch, work 2scs in each of the next 6sts, sc in 10sts, work 2scs in each of the next 7sts, sc in 10sts, join with slst in top of 1st sc, bind off (48)
Front Strap:
with wrong side facing, join yarn in 8th st, counting left from bind off st, ch1, sc in same st and next 3sts (4)
ch1, turn, sc across (4)
repeat row 2 a further 8 times
bind off, leaving a long tail to stitch strap to other side of sandal
Back Strap:
with wrong side facing, ignore the st at the base of bind off st then join yarn in 8th st, counting right from bind off st, ch1, sc in same st and next 4sts (5)
ch1, turn, sc across (5)
repeat row 2 a further 6 times
bind off, leaving a long tail to stitch strap to sole
Bow:
ch7, sc in 2nd ch from hook and across (6)
ch1, turn, sc across (6)
repeat row 2 a further 17 times
bind off, leaving a long tail
fold the bow in half to make a 2″ rectangle then stitch together with the tail, gather the centre of the bow tightly with yarn, then secure and weave in ends
Finishing:
use the tail to attach the front strap to the opposite side of the sandal
fold the back strap down backwards and stitch last row of strap to first row of strap to create a channel for the ribbon
weave in all ends
stitch bow to front strap
cut a piece of thin ribbon, long enough to go around baby’s ankle with spare to tie a bow, heat seal the edges
insert ribbon into back strap channel and stitch in place for safety
Newborn (4.25″ to fit up to 3.5″ foot length)
Sole:
ch12, 4hdcs in 3rd ch from hook, hdc in next 8sts, 4hdcs in last st, (turn to work along opposite side of the ch) hdc in next 8sts, join with slst in 1st hdc (24)
ch2, turn, 2hdcs in same st as ch, hdc in next 7sts, work 2hdcs in each of next 5sts, hdc in next 7sts, work 2hdcs in each of next 4sts, join with slst in top of 1st hdc (34)
ch2, turn, 2hdcs in same st as ch, work 2hdcs in each of the next 6sts, hdc in 10sts, work 2hdcs in each of the next 7sts, hdc in 10sts, join with slst in top of 1st hdc, bind off (48)
Front Strap:
with wrong side facing, join yarn in 8th st, counting left from bind off st, ch1, sc in same st and next 3sts (4)
ch1, turn, sc across (4)
repeat row 2 a further 8 times
bind off, leaving a long tail to stitch strap to other side of sandal
Back Strap:
with wrong side facing, ignore the st at the base of bind off st then join yarn in 9th st, counting right from bind off st, ch1, sc in same st and next 5sts (6)
ch1, turn, sc across (6)
repeat row 2 a further 6 times
bind off, leaving a long tail to stitch strap to sole
Bow:
ch7, sc in 2nd ch from hook and across (6)
ch1, turn, sc across (6)
repeat row 2 a further 17 times
bind off, leaving a long tail
fold the bow in half to make a 2″ rectangle then stitch together with the tail, gather the centre of the bow tightly with yarn, then secure and weave in ends
Finishing:
use the tail to attach the front strap to the opposite side of the sandal
fold the back strap down backwards and stitch last row of strap to first row of strap to create a channel for the ribbon
weave in all ends
stitch bow to front strap
cut a piece of thin ribbon, long enough to go around baby’s ankle with spare to tie a bow, heat seal the edges
insert ribbon into back strap channel and stitch in place for safety
0-3m (4.5″ to fit up to 3.75″ foot length)
Sole:
ch14, 4hdcs in 3rd ch from hook, hdc in next 10sts, 4hdcs in last st, (turn to work along opposite side of the ch) hdc in next 10sts, join with slst in 1st hdc (28)
ch2, turn, 2hdcs in same st as ch, hdc in next 9sts, work 2hdcs in each of next 5sts, hdc in next 9sts, work 2hdcs in each of next 4sts, join with slst in top of 1st hdc (38)
ch2, turn, 2hdcs in same st as ch, work 2hdcs in each of the next 6sts, hdc in 12sts, work 2hdcs in each of the next 7sts, hdc in 12sts, join with slst in top of 1st hdc, bind off (52)
Front Strap:
with wrong side facing, join yarn in 9th st, counting left from bind off st, ch1, sc in same st and next 3sts (4)
ch1, turn, sc across (4)
repeat row 2 a further 9 times
bind off, leaving a long tail to stitch strap to other side of sandal
Back Strap:
with wrong side facing, ignore the st at the base of bind off st then join yarn in 9th st, counting right from bind off st, ch1, sc in same st and next 5sts (6)
ch1, turn, sc across (6)
repeat row 2 a further 6 times
bind off, leaving a long tail to stitch strap to sole
Bow:
ch7, sc in 2nd ch from hook and across (6)
ch1, turn, sc across (6)
repeat row 2 a further 17 times
bind off, leaving a long tail
fold the bow in half to make a 2″ rectangle then stitch together with the tail, gather the centre of the bow tightly with yarn, then secure and weave in ends
Finishing:
use the tail to attach the front strap to the opposite side of the sandal
fold the back strap down backwards and stitch last row of strap to first row of strap to create a channel for the ribbon
weave in all ends
stitch bow to front strap
cut a piece of thin ribbon, long enough to go around baby’s ankle with spare to tie a bow, heat seal the edges
insert ribbon into back strap channel and stitch in place for safety
3-6m (4.75″ to fit up to 4″ foot length)
Sole:
ch16, 4hdcs in 3rd ch from hook, hdc in next 12sts, 4hdcs in last st, (turn to work along opposite side of the ch) hdc in next 12sts, join with slst in 1st hdc (32)
ch2, turn, 2hdcs in same st as ch, hdc in next 11sts, work 2hdcs in each of next 5sts, hdc in next 11sts, work 2hdcs in each of next 4sts, join with slst in top of 1st hdc (42)
ch2, turn, 2hdcs in same st as ch, work 2hdcs in each of the next 6sts, hdc in 14sts, work 2hdcs in each of the next 7sts, hdc in 14sts, join with slst in top of 1st hdc, bind off (56)
Front Strap:
with wrong side facing, join yarn in 11th st, counting left from bind off st, ch1, sc in same st and next 3sts (4)
ch1, turn, sc across (4)
repeat row 2 a further 9 times
bind off, leaving a long tail to stitch strap to other side of sandal
Back Strap:
with wrong side facing, ignore the st at the base of bind off st then join yarn in 9th st, counting right from bind off st, ch1, sc in same st and next 5sts (6)
ch1, turn, sc across (6)
repeat row 2 a further 6 times
bind off, leaving a long tail to stitch strap to sole
Bow:
ch7, sc in 2nd ch from hook and across (6)
ch1, turn, sc across (6)
repeat row 2 a further 17 times
bind off, leaving a long tail
fold the bow in half to make a 2″ rectangle then stitch together with the tail, gather the centre of the bow tightly with yarn, then secure and weave in ends
Finishing:
use the tail to attach the front strap to the opposite side of the sandal
fold the back strap down backwards and stitch last row of strap to first row of strap to create a channel for the ribbon
weave in all ends
stitch bow to front strap
cut a piece of thin ribbon, long enough to go around baby’s ankle with spare to tie a bow, heat seal the edges
insert ribbon into back strap channel and stitch in place for safety
I hope you enjoyed this free crochet pattern and make many pairs of little baby sandals. Feel free to tag me on social media (@adeleuyancrochet) with any of your makes from my patterns. I always love to see your work. Or why not join our Facebook group to show off your creations. Happy crocheting!
Processing…
Success! You're on the list.
Whoops! There was an error and we couldn't process your subscription. Please reload the page and try again.