If you are following along with my Learn to Crochet series, you will remember that, in my last post, I told you everything you needed to gather before you could get started with your project. This week, I am going to show you how to start your project. Most crochet projects (except some that are worked in the round) start with a slipknot and a certain amount of chains. The first row of stitches is worked into those chains and whatever you are crocheting grows from there. So you can see why it’s important that you know how to chain before you learn anything else.
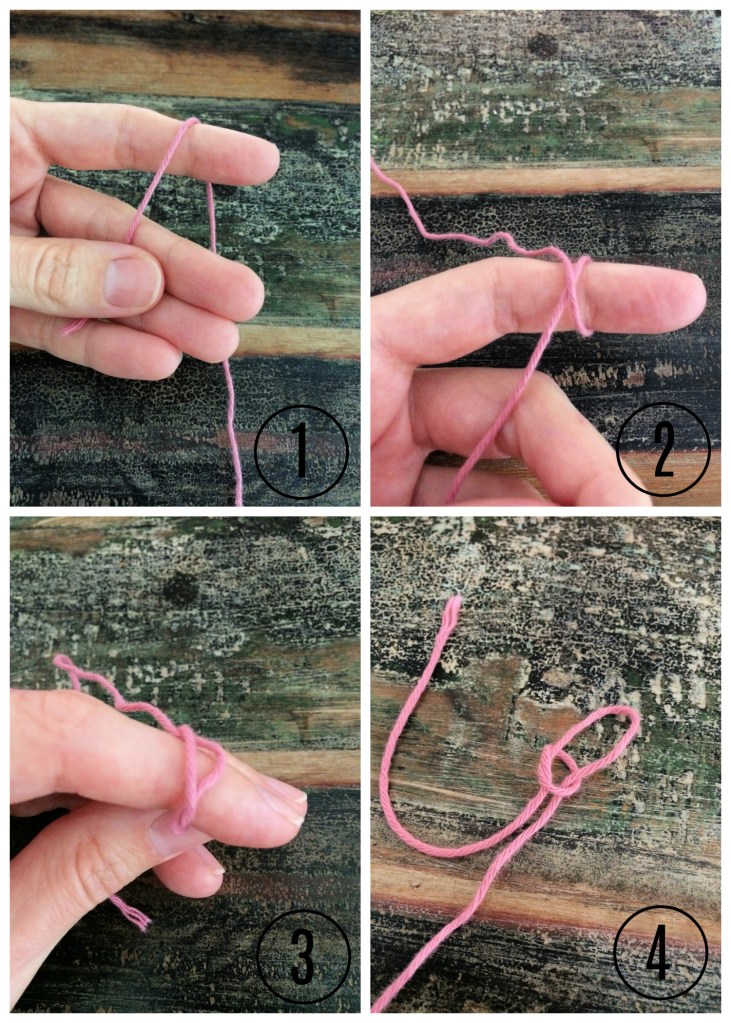
I am using a 4mm crochet hook and 100% cotton yarn. We are just going to start by making a slipknot and 10 chains. To make a slipknot, you need to hold the tail end of the yarn in your left hand and the working end of the yarn in your right hand. Wrap the working end of the yarn around your index finger, from front to back and then to the top of your index finger again, to make an x shape. Pull the working end of the yarn underneath and through the loop on your finger, then pull both the tail end and working end of the yarn, whilst still keeping hold of the loop, to tighten the slipknot.
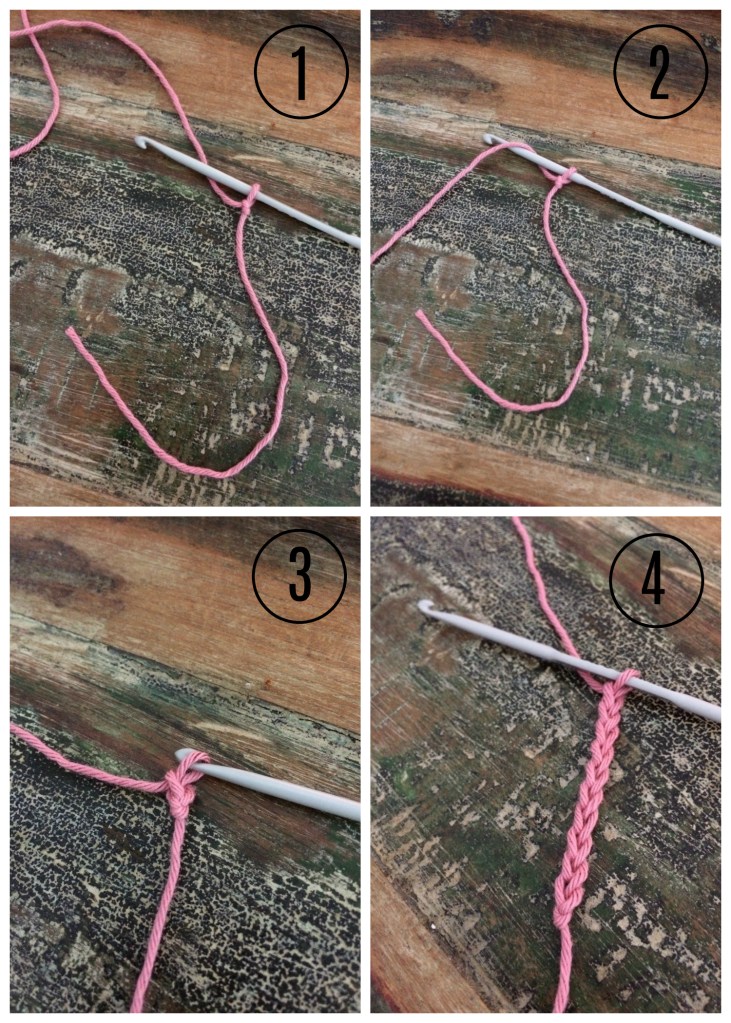
To make your first chain, place the slipknot on to your hook, with the tail end at the back and the working end towards the front. Hold the yarn over your index finger. Pass the hook in front of the yarn, catch the yarn with the hook and pull it through the loop on the hook. Repeat until you have 10 chains on your hook.
Well done! You can now make a slipknot and work the chain stitch. You will be a crochet queen in no time!
Processing…
Success! You're on the list.
Whoops! There was an error and we couldn't process your subscription. Please reload the page and try again.
I just finished writing up the pattern for these tiny baby flower sandals, available in sizes preemie, newborn and 0-3m. They are so so small. My children are all older now so I always forget how tiny little baby feet are. I love that the flower on the sandals can be changed for whichever design you prefer. I made a daisy pair and a sunflower pair, but there are so many other possibilities. I wanted to make a pair with cherry blossom flowers, but I recently had a massive yarn destash and now I have ran out of pink yarn. I think they would look gorgeous though.
The crochet baby sandals can be made in the double knitting yarn of your choice, I used acrylic yarn because I had plenty on hand but I just received a big order of cotton yarn, in lots of pretty colours, so I am planning on making some in cotton aswell. US terminology is used throughout the pattern, and a basic knowledge of crochet is assumed. It is an easy pattern, suitable for beginners, and instructions are given for some stitches. To make your own baby sandals, you will need a 3mm crochet hook, a 4mm crochet hook, a 5mm crochet hook, 20g beige double knit yarn, 10g white double knit yarn, 10g double knit yarn in your preferred flower colour, a tape measure, a pair of scissors, a yarn needle and two small buttons.
You can find this pattern in my Etsy shop, with my other PDF patterns and things I have crocheted for sale. Feel free to join us in my Facebook group to see more pictures, get feedback and ask any questions you may have.
Processing…
Success! You're on the list.
Whoops! There was an error and we couldn't process your subscription. Please reload the page and try again.
Summer is a tricky time for crocheters, because most of the crochet things we make are more suited for cold weather. I know I always struggle a lot more with finding things to crochet in summer, so with that in mind, I compiled a list of summer friendly, free crochet patterns for you to choose from. Please go and visit the blogs of the patterns you like and show the designers some love ❤
How perfect would these fruit coasters be for a garden party!
There you go, plenty of inspiration to keep you crocheting until the weather cools down again. I hope you enjoy looking through these cute ideas and planning your next project. Stay safe and happy crocheting!
Processing…
Success! You're on the list.
Whoops! There was an error and we couldn't process your subscription. Please reload the page and try again.
Is there anything cuter than a baby in a baby bear hat? I love how adorable these hats are, especially considering how quick they are to make. This is an easy project so will be perfect for a beginner. The pattern can be used to make a basic beanie aswell, but the bear ears really make the hat for me, so I add them on as many things as possible.
To make your own baby bear hat, you will need a 6mm crochet hook, double knit yarn, a tape measure, a pair of scissors and a yarn needle.
This pattern is for a hat to fit a newborn, with a head circumference of up to 14.5″. At the end of round 3, the hat should measure approximately 4″ in diameter. Please bear in mind that I crochet quite tightly, so you may need to change your hook size to get the right diameter. Use whichever hook you need to get the correct hat size. When you have finished your hat, the length should be around 5.25”. You can add or remove length rows as needed, to get the right size.
Baby Bear Hat (Free Crochet Pattern)
With a 6mm crochet hook and two strands of double knit yarn held together –
1. make a magic loop, ch2, work 12dcs in loop, join with slst in top of 1st dc, pull centre yarn tail tight to close magic loop (12)
2. (inc row) ch2, turn, work 2dcs in st at base of ch and each st around, join with slst in top of 1st dc (24)
3. (inc row) ch2, turn, work 2dcs in st at base of ch, dc in next st, *2dcs in next st, dc in next st*, repeat from – around, join with slst in top of 1st dc (36)
4-8. ch2, turn, work dc in st at base of ch and in each st around, join with slst in top of 1st dc (36)
9. ch1, turn, fpdc around 1st st of previous row, *bpdc around next st of previous row, fpdc around next st of previous row*, repeat from *-* around to end, join with slst in top of 1st fpdc
10. bind off and weave in ends
11. make a magic loop, ch2, work 6dcs in loop, pull centre yarn tail tight to close magic loop (6)
12. ch1, work 2scs in each st across, bind off, leaving a long tail to attach ear to hat (12)
13-14. repeat rows 11-12
15. use the long tail left on the ears to attach them to the hat, I like to attach the ears between the 2nd and 4th rows on the hat
I hope you have enjoyed this free baby bear hat crochet pattern. If you make one, please let me know so I can see your amazing work. You can tag me on social media (@adeleuyancrochet) or why not join our Facebook group to show off your creations.
Processing…
Success! You're on the list.
Whoops! There was an error and we couldn't process your subscription. Please reload the page and try again.
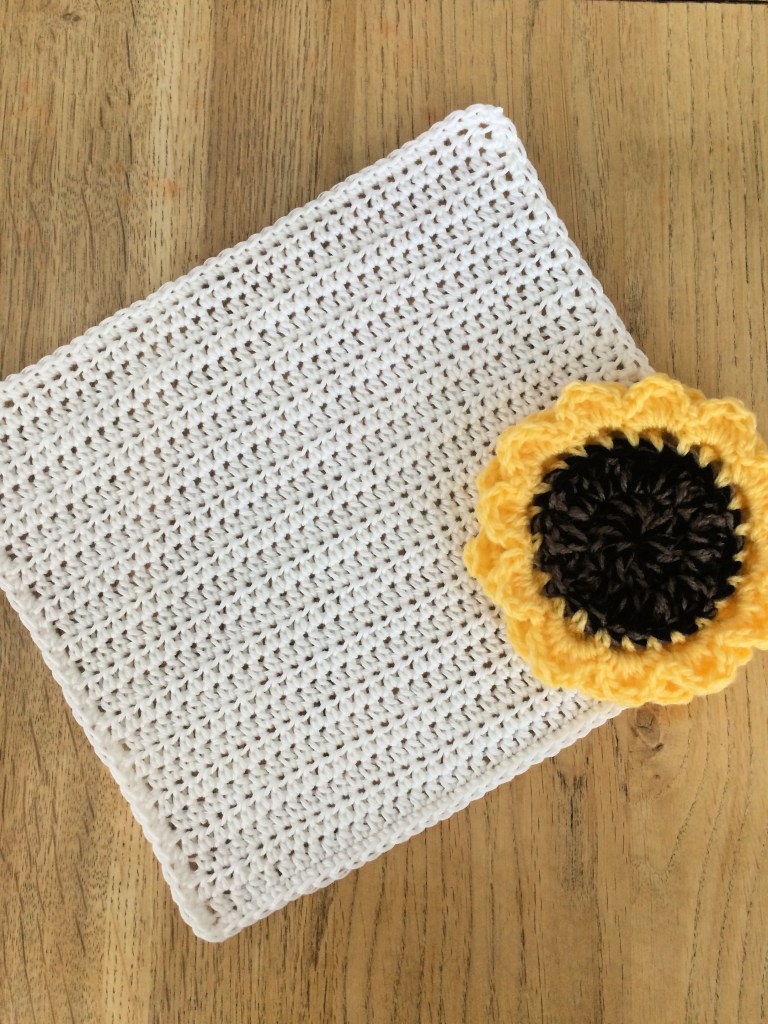
Is there anything more summery than a sunflower? I love how bright they are and how they always turn their faces to the sun. This week, the weather has been less than summery so I decided to bring summer inside instead. I absolutely adore how much this table set brightens up our dining table.
I made placemats, coasters, napkins and napkin holders. The inspiration to make this set actually came from the slippers I made last week. The flower on the front is almost but not quite a sunflower, so I decided I wanted to make an actual sunflower. I made the coaster first, then made lots more coasters to go with it. I was actually planning on leaving it at that but then I thought that a placemat would look lovely, to go with the coaster. While I was making the placemat, I decided to make a napkin holder and finally, I thought I may aswell make a napkin to go with it and complete the set. The final product is a full sunflower table set, for use everyday or for parties.
The coaster, placemat and napkin holder can be made in the yarn of your choice, although I would definitely recommend something washable. Cotton yarn, or another natural yarn, should be used for the napkin, to make it absorbent.
With this pattern, you will learn how to make a sunflower coaster, a sunflower placemat, a cotton napkin and a sunflower napkin holder. The pattern is written using US terminology. Basic knowledge of crochet is assumed, however the pattern is suitable for beginners and instructions are given for some stitches. To make this pattern, you will need a 3.5mm crochet hook, a 5mm crochet hook, 60g brown double knit yarn, 60g black double knit yarn, 50g yellow double knit yarn, 50g white cotton double knit yarn, a pair of scissors and a yarn needle.
This pattern is available in my Etsy store, where you can also find my handmade crochet clothes and accessories. Feel free to join us in my Facebook group to see more pictures, get feedback and ask any questions you may have.
Processing…
Success! You're on the list.
Whoops! There was an error and we couldn't process your subscription. Please reload the page and try again.
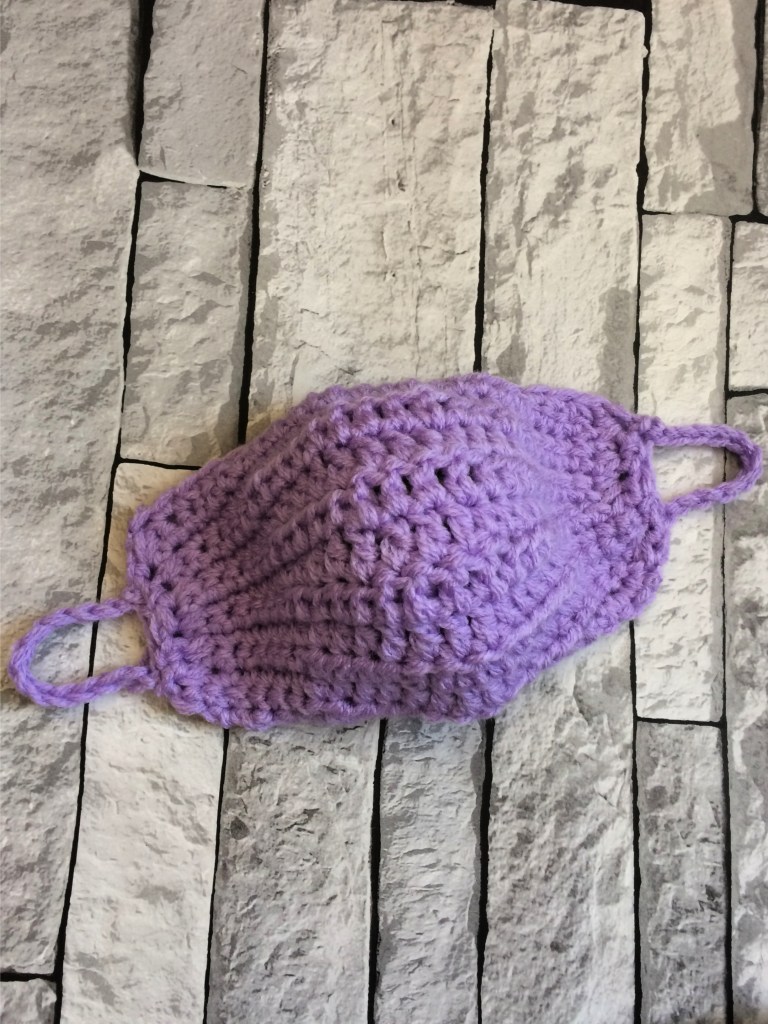
For the past few weeks, like many others I am sure, I have been trying to think of ways I can help people whilst being lucky enough to be able to stay at home with my children. Here on the Isle of Man, we have not had the high case and death rates that we are seeing in other countries around the world. We were locked down really quickly and are still locked down, which has given me plenty of time (when I am not homeschooling!) to think about what I can do to help. Unfortunately, there does not seem to be much that can be crocheted to help those in need. A few weeks ago, I shared my Crochet Face Mask (Free Pattern), and today I would like to share this pattern for a face mask ear saver adaptor. This adaptor will only work for the type of face masks with the elasticated straps, but will hopefully stop the pain from having straps stretched around ears for hours at a time.
To make your own ear saver adaptor, you will need a 3mm crochet hook, a small amount of 100% cotton yarn, two plastic buttons and a yarn needle.
This face mask ear saver adaptor is very quick and easy to make. Using cotton yarn and plastic buttons ensures that it can be cleaned at high temperatures and disinfected appropriately, which is obviously crucial at the moment.
Face Mask Ear Saver Adaptor (Free Crochet Pattern)
1. Ch26, work 3dcs in 3rd chain from hook, dc in next 22sts, 6dcs in last st, working on opposite side of chain, dc in next 22sts, work 3dcs in same space as first 3dcs, join with slst in top of 1st dc (56)
2. Bind off, attach a button at each end and weave in all ends
I have made up a little stash of these and will be donating them to local keyworkers. I hope you can also make use of this free pattern and crochet some of your own for yourself or for keyworkers in your area. Let me know if you do use this pattern or any of my other patterns. Feel free to tag me in your work on social media (@adeleuyancrochet). I love to see what you are all making. Or why not join our Facebook group to show off your creations. Stay safe and happy crocheting!
Processing…
Success! You're on the list.
Whoops! There was an error and we couldn't process your subscription. Please reload the page and try again.
With everything going on at the minute, and the amount of conflicting information available, it is very difficult to know what to do for the best. I have seen lots of articles saying that face masks should not be worn by the general public because they do not work and are only meant to be used for a short time. However, I have also seen plenty of articles saying that every little helps and that we should be wearing masks, just like other countries are doing, and that if they do nothing else, at least they stop you from touching your face whilst outside, and potentially stop you from infecting other people if you are a carrier but are not showing symptoms. That last point was enough for me to make face masks for my family. We are mostly staying at home, and we are extremely lucky to be able to, but the thought of possibly being a carrier and infecting someone who does not have that luxury or may have underlying health issues, does not sit well with me at all. A few days ago, I sat down and wrote out a pattern for face masks. I made three sizes, adult, child and toddler, and will share all three with you today. It is, of course, up to you whether you choose to wear masks in public, but, for me, the pros far outweigh the cons.
To make your own face mask, you will need some double knit yarn (I used two strands held together), a 4mm, 6mm or 6.5mm hook, a pair of scissors and a yarn needle. You will also need some type of cotton material, to be used as a lining. The masks work up very quickly and they are very easy to make.
Adult:
1. with a 6.5mm crochet hook and two strands of double knit yarn held together, ch25, sc in 2nd ch from hook and next 5sts, hdc in 4sts, dc in 4sts, hdc in 4sts, sc in 6sts
2-11. ch1, turn, sc in 6sts, hdc in 4sts, dc in 4sts, hdc in 4sts, sc in 6sts
12. ch1, turn, *sc2tog, sc in 2sts*, repeat from *-* to end, bind off
13. with wsf, join yarn at bottom corner, ch1, *sc2tog, sc in 2sts*, repeat from *-* across bottom edge, bind off
14. with rsf, join yarn at top corner of mask, ch1, sc2tog in every stitch down the side of the mask (7)
15. ch1, turn, sc2tog, sc3tog, sc2tog (3)
16. ch12, turn, join with slst in last st of row, bind off
17-19. repeat rows 14-16 on opposite side of mask
20. weave in all ends, line with cotton and wear!
Child:
1. with a 6mm crochet hook and two strands of double knit yarn held together, ch25, sc in 2nd ch from hook and next 5sts, hdc in 4sts, dc in 4sts, hdc in 4sts, sc in 6sts
2-11. ch1, turn, sc in 6sts, hdc in 4sts, dc in 4sts, hdc in 4sts, sc in 6sts
12. ch1, turn, *sc2tog, sc in 2sts*, repeat from *-* to end, bind off
13. with wsf, join yarn at bottom corner, ch1, *sc2tog, sc in 2sts*, repeat from *-* across bottom edge, bind off
14. with rsf, join yarn at top corner of mask, ch1, sc2tog in every stitch down the side of the mask (7)
15. ch1, turn, sc2tog, sc3tog, sc2tog (3)
16. ch12, turn, join with slst in last st of row, bind off
17-19. repeat rows 14-16 on opposite side of mask
20. weave in all ends, line with cotton and wear!
Toddler:
1. with a 4mm crochet hook and two strands of double knit yarn held together, ch25, sc in 2nd ch from hook and next 5sts, hdc in 4sts, dc in 4sts, hdc in 4sts, sc in 6sts
2-10. ch1, turn, sc in 6sts, hdc in 4sts, dc in 4sts, hdc in 4sts, sc in 6sts
11. ch1, turn, *sc2tog, sc in 2sts*, repeat from *-* to end, bind off
12. with wsf, join yarn at bottom corner, ch1, *sc2tog, sc in 2sts*, repeat from *-* across bottom edge, bind off
13. with rsf, join yarn at top corner of mask, ch1, sc2tog in every stitch down the side of the mask, sc in last st (7)
14. ch1, turn, sc2tog, sc3tog, sc2tog (3)
15. ch12, turn, join with slst in last st of row, bind off
16-18. repeat rows 13-15 on opposite side of mask
19. weave in all ends, line with cotton and wear!
I hope you have enjoyed this free pattern. If you make anything from my patterns, please tag me on social media (@adeleuyancrochet) so I can see. I love to see what you have been making. Or why not join our Facebook group to show off your creations. For now, stay safe and happy crocheting!
Processing…
Success! You're on the list.
Whoops! There was an error and we couldn't process your subscription. Please reload the page and try again.
Ever since my babies were born, I have preferred an earflap hat over a basic beanie. I find that an earflap hat keeps little ears warmer, it can be tied on to stop it from falling off, and it tends to fit for longer than a beanie hat. All of my babies have had earflap hats made by me and it is my usual gift for new babies aswell.
A few years ago, I came up with this pattern for an owl earflap hat. Since then, I have made hundreds of hats with it. This hat is really easy to make but it looks like a lot of work went into it. It can be made in a variety of colours to mix it up but looks amazing in neutral colours well.
This pattern is for an owl earflap hat in size newborn. Newborn size will fit up to approximately 14.5″ head circumference. The finished hat has a diameter of 3.9″ and is 4.75″ in height.
To make your own owl earflap hat, you will need approximately 30g double knit yarn, a 3mm crochet hook, a 4mm crochet hook, scissors, a tape measure, scraps of white, black and yellow yarn and a yarn needle.
Crochet Owl Earflap Hat (Free Pattern)
Hat:
1. with a 4mm crochet hook, make a magic loop, ch2, work 12dcs in loop, join with slst in top of 1st dc, pull centre yarn tail tight to close magic loop (12)
2. (inc row) ch2, turn, work
2dcs in st at base of ch and each st around, join with slst in top of
1st
dc (24)
3. (inc row) ch2, turn, work
2dcs in st at base of ch, dc in next st, *2dcs in next st, dc in next
st*, repeat from *-* around, join with slst in top of 1st
dc (36)
4. (inc row) ch2, turn, work
2dcs in st at base of ch, dc in next 2sts, *2dcs in next st, dc in
next 2sts*, repeat from *-* around, join with slst in top of 1st
dc (48)
5-6. ch2,
turn, work dc in st at base of ch and in each st around, join with
slst in top of 1st
dc (48)
7-11. change
to second yarn colour if using, ch2, turn, work dc in st at base of
ch and in each st around, join with slst in top of 1st
dc (48)
12. bind
off and weave in ends
Earflap 1:
1. with
wrong side facing, join yarn in 6th
st from bind off, ch1, sc in same st and next 12sts (13)
2. ch1, turn, sc2tog, sc across
to last 2sts, sc2tog (11)
3. ch1, turn, sc in same st and
across (11)
4. ch1, turn, sc2tog, sc across
to last 2sts, sc2tog (9)
5. ch1, turn, sc in same st and
across (9)
6. ch1, turn, sc2tog, sc across
to last 2sts, sc2tog (7)
7. ch1, turn, sc in same st and
across (7)
8. ch1, turn, sc2tog, sc across
to last 2sts, sc2tog (5)
9. ch1, turn, sc in same st and
across (5)
10. ch1, turn, sc2tog, sc across
to last 2sts, sc2tog (3)
11. ch1, turn, sc in same st and
across (3)
12. bind off and weave in ends
Earflap 2:
1. with
wrong side facing, join yarn in 30th
st from bind off, ch1, sc in same st and next 12sts (13)
2. ch1, turn, sc2tog, sc across
to last 2sts, sc2tog (11)
3. ch1, turn, sc in same st and
across (11)
4. ch1, turn, sc2tog, sc across
to last 2sts, sc2tog (9)
5. ch1, turn, sc in same st and
across (9)
6. ch1, turn, sc2tog, sc across
to last 2sts, sc2tog (7)
7. ch1, turn, sc in same st and
across (7)
8. ch1, turn, sc2tog, sc across
to last 2sts, sc2tog (5)
9. ch1, turn, sc in same st and
across (5)
10. ch1, turn, sc2tog, sc across
to last 2sts, sc2tog (3)
11. ch1, turn, sc in same st and
across (3)
12. bind off and weave in ends
Eyes: make two
1. with black yarn and a 3mm
hook, make a magic loop, ch2, work 12hdcs in loop, join with slst in
top of 1st
hdc, pull centre yarn tail tight to close magic loop (12)
2. (inc row) with colour yarn,
ch2, turn, work 2hdcs in st at base of ch and each st around, join
with slst in top of 1st
hdc (24)
3. (inc row) with white yarn,
ch2, turn, work 2dcs in st at base of ch, dc in next st, *2dcs in
next st, dc in next st*, repeat from *-* around, join with slst in
top of 1st
dc (36)
4. bind off, leaving a long tail
to attach to hat
Beak:
1. with yellow yarn and a 3mm
hook, ch7, sc in 2nd ch from hook and across (6)
2. ch1, turn, sc2tog, sc across
to last 2sts, sc2tog (4)
3. ch1, turn, sc across (4)
4. ch1, turn, sc2tog, sc2tog (2)
5. ch1, turn, sc across (2)
6. ch1, turn, sc2tog, bind off, leaving a long tail to attach to hat
Finishing:
1. with right side facing, join yarn at back, ch1, sc in each st around bottom of hat to bottom corner of 1st earflap, work 2scs in corner st, sc in middle st, ch35, slst in 2nd ch from hook and across, sc again in middle st to secure, work 2scs in corner st, sc around to bottom corner of 2nd earflap, work 2scs in corner st, sc in middle st, ch35, slst in 2nd ch from hook and across, sc again in middle st to secure, work 2scs in corner st, sc around to end, join with slst in 1st st, bind off and weave in ends
2. attach eyes to front of hat
3. attach beak under the eyes
4. to make the ear tassels, cut 6 lengths of yarn 5″ in length then use a crochet hook to pull them through the hat between the 3rd and 4th row, secure with a loop
I hope you enjoyed making this pretty hat. Let me know if you make it. I would love to see your creations on social media. Tag me (@adeleuyancrochet) so I can find it. Or why not join our Facebook group to show off your creations.
What other patterns would you like to see?
Processing…
Success! You're on the list.
Whoops! There was an error and we couldn't process your subscription. Please reload the page and try again.
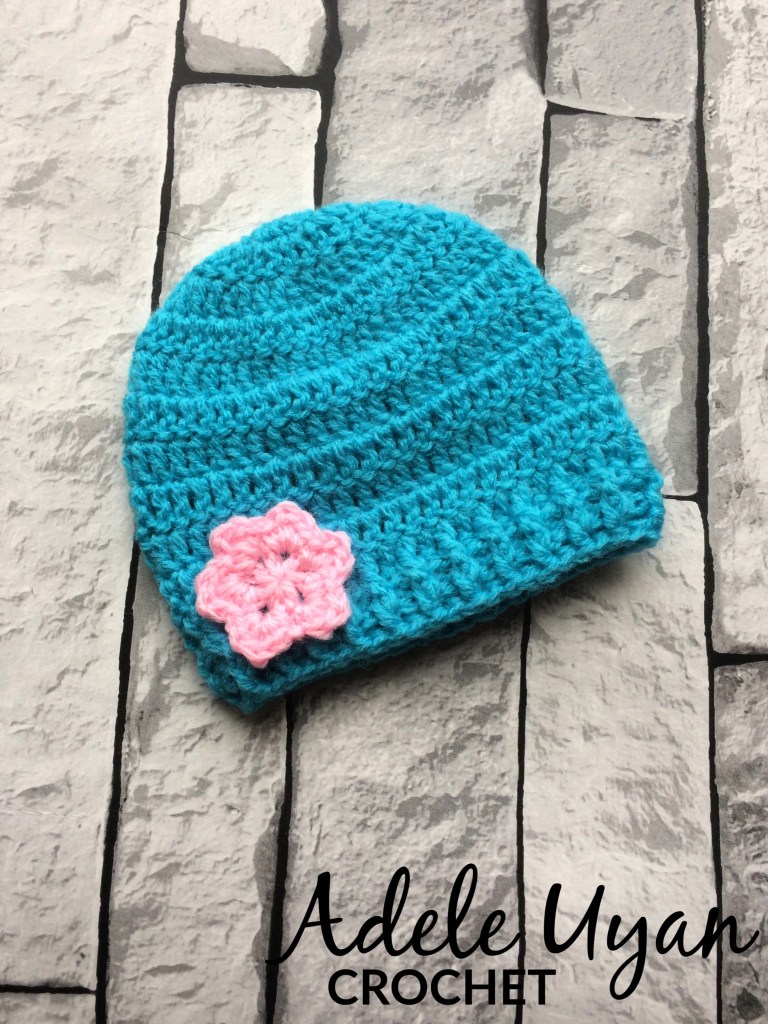
I made my first preemie flower beanie around 8 years ago, for a friend of mine who had just given birth to her baby at 24 weeks gestation. This hat fit the baby really nicely and she was approximately 5lbs at the time.
This hat will fit up to approximately 12″ head circumference. I tend to crochet quite tightly so you may need to adjust your hook size to get the diameter you need. At the end of round 4, the hat should measure 3.4″ in diameter, and the finished hat should measure 4.5″ in length.
To make your own preemie flower beanie hat, you will need some super soft DK yarn, a 3mm crochet hook, a tape measure, a pair of scissors and a yarn needle.
Preemie Flower Beanie (Free Crochet Pattern)
With a 3mm crochet hook –
1. make a magic loop, ch2, work 12dcs in loop, join with slst in top of 1st dc, pull centre yarn tail tight to close magic loop (12)
2. (inc row) ch2, turn, work 2dcs in st at base of ch and each st around, join with slst in top of 1st dc (24)
3. (inc row) ch2, turn, work 2dcs in st at base of ch, dc in next st, *2dcs in next st, dc in next st*, repeat from *-* around, join with slst in top of 1st dc (36)
4. (inc row) ch2, turn, work 2dcs in st at base of ch, dc in next 2sts, *2dcs in next st, dc in next 2sts*, repeat from *-* around, join with slst in top of 1st dc (48)
5-10. ch2, turn, work dc in st at base of ch and in each st around, join with slst in top of 1st dc (48)
11. join contrasting yarn if using, ch2, turn, work dc in st at base of ch and in each st around, join with slst in top of 1st dc (48)
12-13. ch1, turn, fpdc around 1st st of previous row, *bpdc around next st of previous row, fpdc around next st of previous row*, repeat from *-* around to end, join with slst in top of 1st fpdc
14. bind off and weave in ends
Flower:
with contrasting yarn, make a magic loop, ch1, *sc in ring, ch3*, repeat from *-* five more times to make six petals, join with slst in top of 1st sc, pull centre yarn tail tight to close magic loop
ch1, do not turn, (sc, hdc, dc, hdc, sc) in each chsp around, join with slst in top of 1st sc
bind off, attach to hat and weave in ends
I hope you have enjoyed this free pattern. I would love to see any hats you make using it. Feel free to tag me on social media (@adeleuyancrochet) so I can see them. Or why not join our Facebook group to show off your creations. Happy crocheting!
Processing…
Success! You're on the list.
Whoops! There was an error and we couldn't process your subscription. Please reload the page and try again.
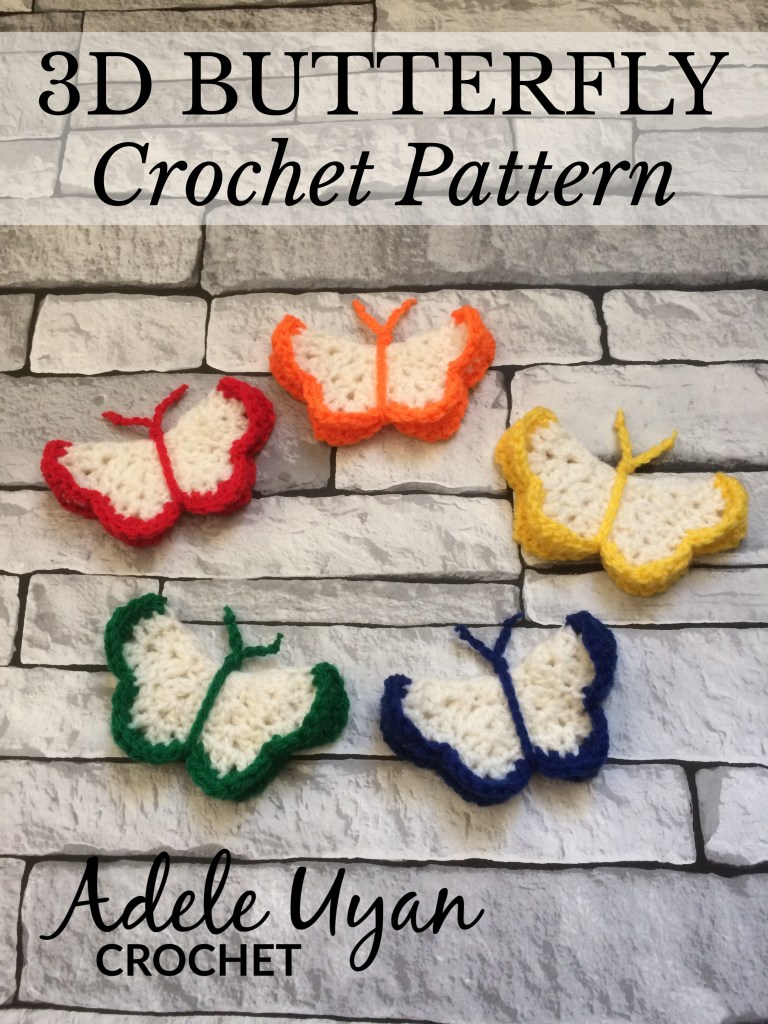
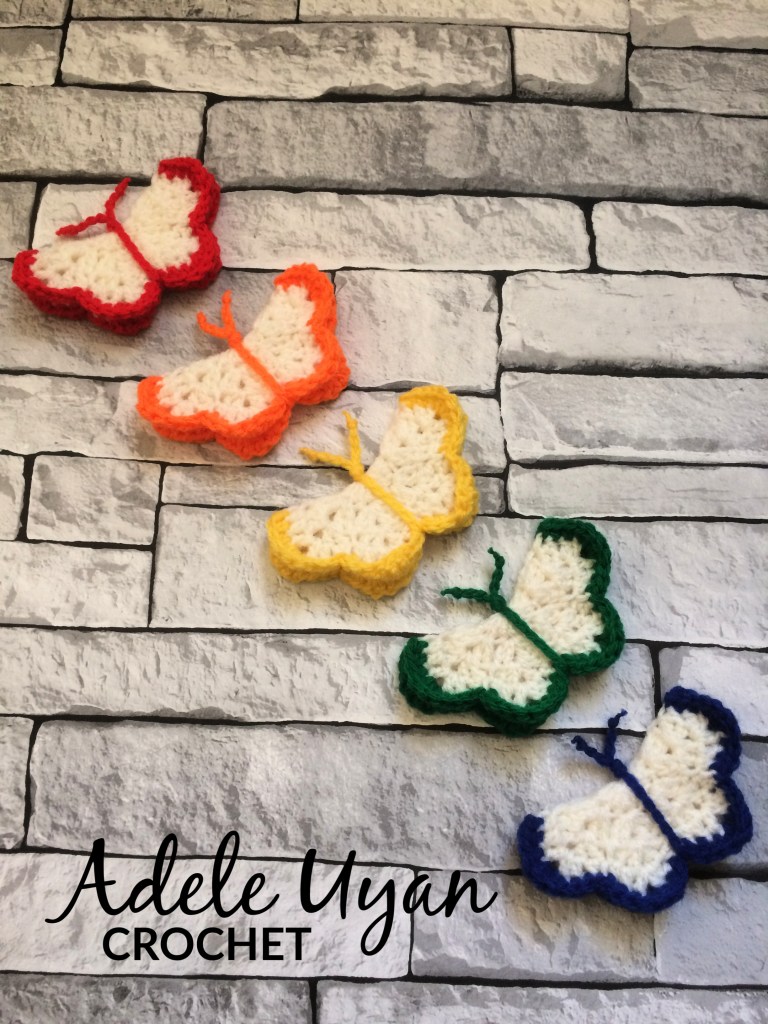
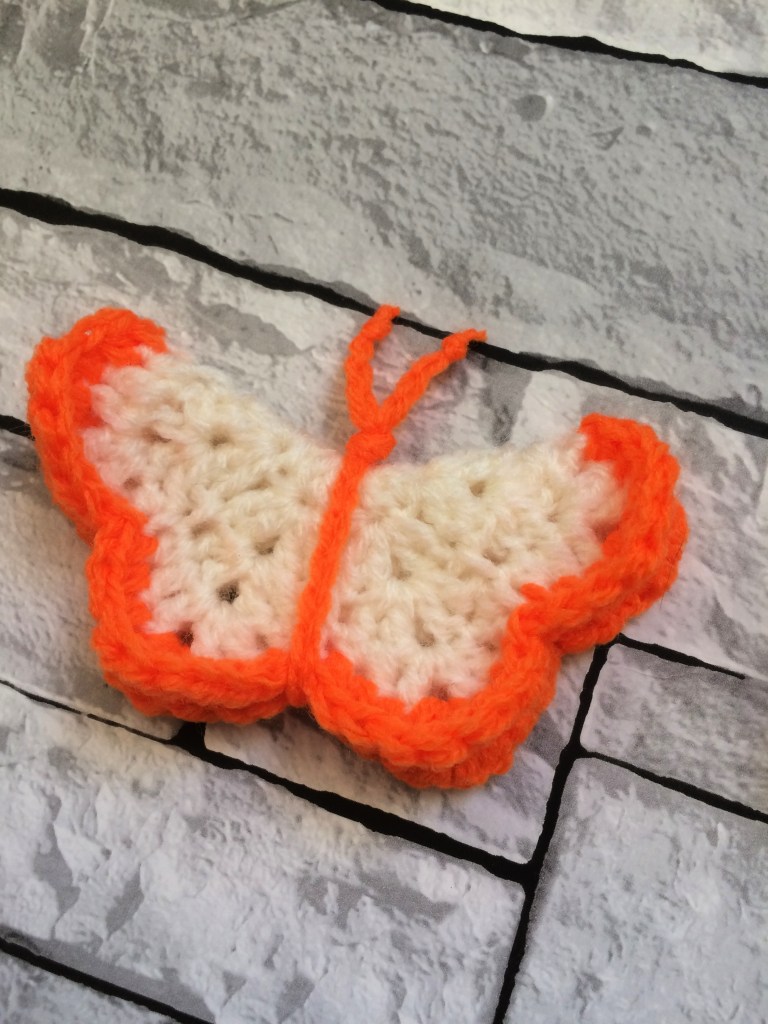
I first made a little 3D butterfly about 5 years ago, for a yarn bombing project I was taking part in with my local crochet group. We all made lots of flowers and butterflies and decorated a wall in the town centre with them. It looked amazing! I recently tried to follow the pattern that I wrote back then and, as I wasn’t as experienced in pattern writing back then, it seemed unnecessarily complicated. I found myself getting frustrated with the pattern so I decided to update it. This is the updated pattern, easier and quicker to make but the end butterfly is still almost identical.
If you would like to make your own, you will need a 4mm crochet hook and DK yarns in a main colour and a contrasting colour. You will also need a pair of scissors, a stitch marker and a yarn needle.
3D Butterfly (Free Crochet Pattern)
Wings:
1. with main colour yarn, make a magic loop, ch2, work 16dcs in loop, join with slst in top of 1st dc, pull centre yarn tail tightly to close loop (16)
2. ch2, do not turn, 2dcs in st at base of ch, ch1, 2dcs in same st, sk1st, *(2dcs, ch1, 2dcs) in next st, sk1st*, repeat from *-* to end, join with slst in top of 1st dc
3. do not ch or turn, place stitch marker under join st, *2dcs in next chsp, ch1, 2dcs in same chsp, slst inbetween previous row’s shells*, repeat from *-* to end, join with slst in top of 1st dc
4. ch1, do not turn, hdc in st at base of ch, dc in next st, (dc, ch1, dc) in chsp, dc in next st, hdc in next st, slst in previous row’s slst, *hdc in next st, dc in next st, (dc, ch1, dc) in chsp, dc in next st, hdc in next st, slst in previous row’s slst*, repeat from *-* to end, join with slst in top of 1st hdc
5. join contrasting colour yarn, ch1, do not turn, *hdc in 3sts, 3dcs in chsp, hdc in 3sts, slst in previous row’s slst*, repeat from *-* to end, join with slst in top of 1st hdc, bind off and weave in ends
Body:
1.with contrasting colour yarn, ch36, bind off, fold butterfly in half and wrap body around wings, tie at the top of the wings to secure, tie a knot in the top of each antennae and weave in ends
I hope you enjoyed making this little 3D crochet butterfly. I would love to see any butterflies you make using this pattern. Feel free to tag me on social media (@adeleuyancrochet) so I can see them! Or why not join our Facebook group to show off your creations. Happy crocheting.
Processing…
Success! You're on the list.
Whoops! There was an error and we couldn't process your subscription. Please reload the page and try again.